Novel laser Doppler tachometer  Download: 678次
1. Introduction
Rotational speed measuring is the most basic and important task in the fields of precision manufacturing, instrumentation, and industrial control[13" target="_self" style="display: inline;">–
Commonly used methods to measure rotational speed include the frequency measuring method, periodic measuring method, and frequency–period measuring method, and they calculate the rotational speed by measuring the frequency of the periodic pulse signal caused by the rotor. Because of the pulse quantization error , their measurement accuracy will have certain errors[4
As a non-contact measurement method, laser Doppler technology can avoid the abovementioned shortcomings, and it has been widely used[9,10]. Scholars at home and abroad have proposed a variety of laser Doppler velocity measurement models, such as the laser heterodyne detection technology with the relative error of 0.5%[11], the reference beam laser Doppler velocity measuring system with that of 0.4%[12], the self-mixing speckle spectrum analysis method with that of 2%[13,14], and the dual-beam differential Doppler velocity measuring technology with that of 1.1%[15]. However, these methods can only obtain the linear velocity of the measured point directly, and then the radius of the object must be measured to further calculate the rotational speed. Therefore, the measurement accuracy of rotational speed will be affected by the radius measurement in many occasions. For example, the radius of the roller used for vehicle brake performance testing in the vehicle inspection line cannot be measured directly, because it is half-embedded in the ground. Moreover, the installation angle of the actual measuring system and the theoretical value will inevitably have deviations, so the measurement accuracy will also be affected.
In this paper, a new non-contact method for measuring the instantaneous rotational speed based on the parallel-beam laser Doppler model is proposed. This method can output the rotational speed in real time without measuring the object’s radius. Moreover, the measuring error caused by insufficient installation accuracy (the deviation of the installation angle) of the measuring system can also be avoided. By targeted experiments, the unique characteristics are demonstrated, and we believe that the novel tachometer has great application prospects.
2. Principle of Parallel-Beam Laser Doppler Velocity Measurement System
The optical Doppler effect is the theoretical basis of the laser Doppler velocimeter (LDV), and it indicates the relationship of the measured point’s velocity and the Doppler frequency shift [16]:
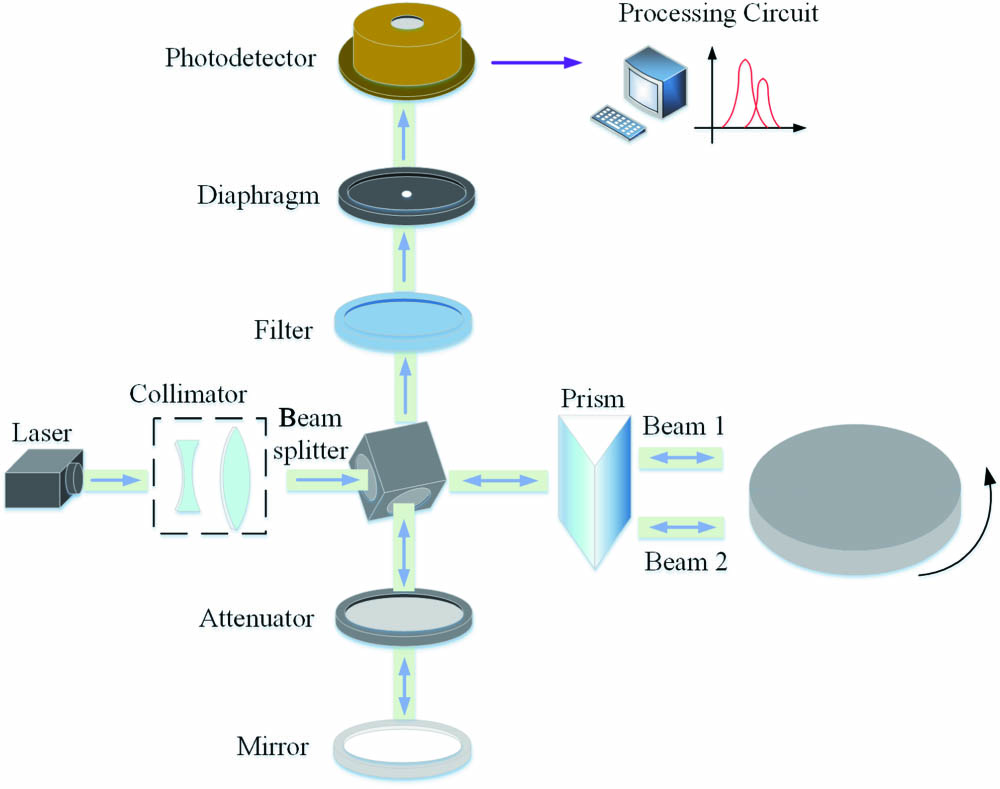
In order to solve the problem of measurement error caused by insufficient installation accuracy and radius measurement, a new method called the parallel-beam laser Doppler model for measuring the instantaneous rotational speed is proposed. The structure of the new rotational speed measuring system is shown in Fig. 1.
The light emitted from the laser is collimated by a collimator, and then it is divided by a beam splitter whose reflectivity is 50%. The reflected beam returns in the original direction through the attenuator and the mirror and then gets to the photodetector through the beam splitter, the filter, and the diaphragm, which is the reference light. The transmitted beam is divided into parallel beams by the beam splitter prism with equal optical paths, and they get to the surface of the measured rotating object. The scattered light of the two beams returning in their own original direction is combined as the signal light. Because the angle between one beam and the velocity direction of its corresponding measured point on the rotating object is different from that of another beam, the signal light contains two different frequencies. We can accurately extract two Doppler frequencies by the dual-spectrum-peak-processing circuit used in the measuring system and then calculate the rotational speed. The mixing of the signal light and the reference light on the detector’s photosensitive surface will produce two different Doppler frequencies, and they can be given by
The fast Fourier transform (FFT) is used for signal processing, mainly because this method has a strong ability to extract signals from noise and can accept discontinuous signals[17]. The original signal is first high-pass filtered to remove the base signal in the LabVIEW platform. Then, FFT is performed on the filtered signal to obtain its frequency spectrum. The frequency spectrum refinement algorithm and correction technique are used to process the frequency spectrum of the signal. Finally, the Doppler frequency is extracted from the corrected frequency spectrum (find the first peak by searching for the extreme value, which is the Doppler frequency of beam 1, and then remove it to find another peak, which is the Doppler frequency of beam 2; finally, the difference between the two Doppler frequencies can be obtained), and then the velocity of the object can be calculated.
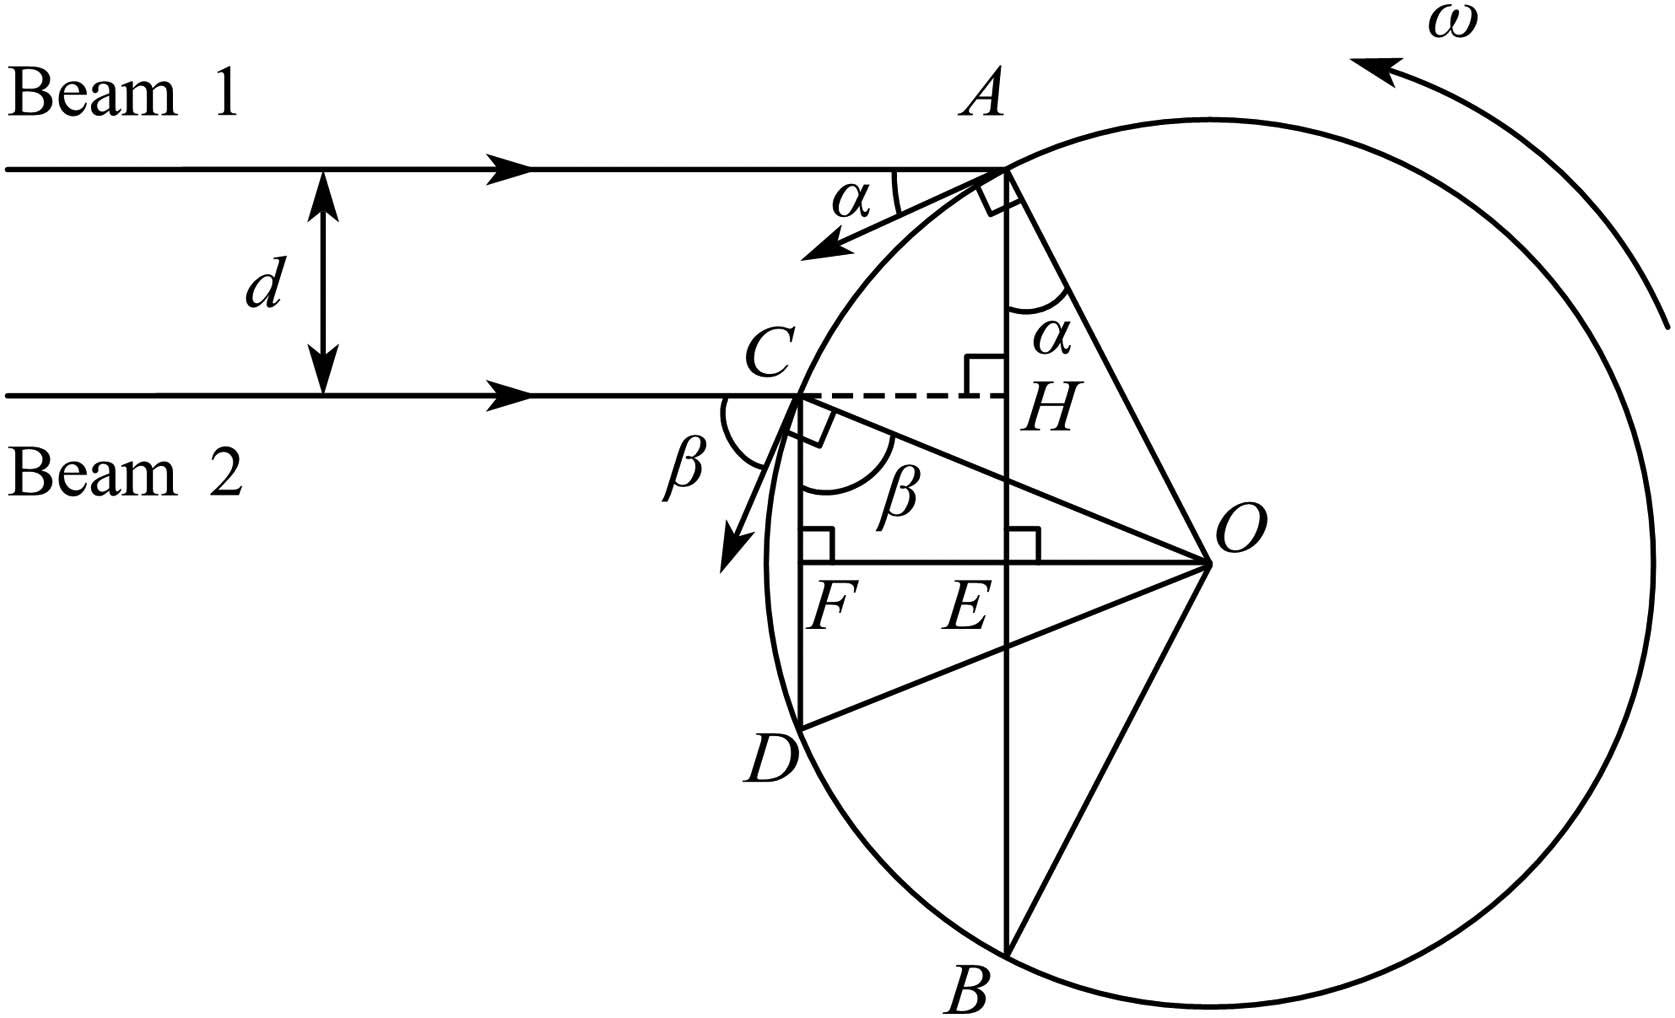
Figure 2 shows the geometric relationships between the two beams and the measured rotating body. is the angle between beam 1 and the tangential velocity of the corresponding measured point; is that of beam 2; is the radius of the measured object; and is the angular velocity of the measured object. Therefore, Eqs. (2) and (3) can be expressed as
According to the geometric relationships contained in Fig. 2, Eqs. (4) and (5) can be further expressed as
So, the difference of two Doppler frequencies generated by the two beams can be given by
From Eq. (8), we can obtain the rotational speed of the measured object:
According to Eq. (9), the rotational speed of the measured object can be calculated only with the distance between beam 1 and beam 2, the wavelength of laser, and the difference of two Doppler frequencies. Therefore, the fluctuation of the object’s radius and the installation angle deviation of the measurement system will not bring about measurement error.
3. Experiments
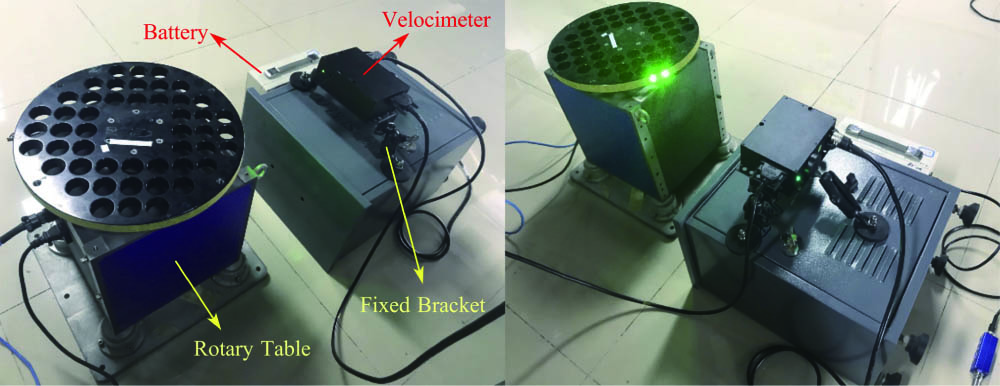
The rotational speed measuring system shown in Fig. 3 is developed according to Fig. 1, and its main performance parameters are shown in Table 1.
Table 1. Main Performance Parameters of Main Components
| ||||||||||||||||||||||
It can be seen from Table 1 that the rotational speed measurement range of the measuring system shown in Fig. 3 is 4–8400 deg/s, which is determined by the Doppler frequency range that the tachometer can detect, that is, 20 kHz–50 MHz. Referring to Fig. 2, the diameter of the turntable is 360 mm, and the angle is usually 60 deg; then the can be calculated by the geometric relationship . Therefore, the limitations of the detected Doppler frequency can be given by
According to Eq. (10), the range of can be calculated: . In particular, the calculated range is only for the experimental turntable here. When measuring different objects (the radius will change), we need to adjust the installation angles and to meet the requirement of the rotational speed measurement range. The specific action is to choose the prism with suitable size to change the distance . Therefore, the needed installation angles and can be obtained.
In addition, the distance between the parallel beams is 12 mm, and it is measured by the spot position detector[18] (the four-quadrant detector). Generally, the position detection accuracy of the four-quadrant detector can reach [19], and, so, the relative error caused by the distance measurement is , which is less than , so the accuracy is high.
In order to verify the above proposed characteristics of the tachometer designed in this paper, experiments were carried out from four aspects: accuracy evaluation, radius sensitivity analysis, angle sensitivity analysis, and optimization experiment. With the help of the Swiss turntable, an experimental platform was built, as shown in Fig. 3. The rotational speed of the Swiss turntable is very stable, and its accuracy is good to .
3.1 Accuracy evaluation experiment
The rotational speed of the turntable is set to 200, 600, and 1200 deg/s, respectively, and, then, the corresponding measured values and the measurement accuracy of the tachometer can be obtained, as shown in Fig. 4.
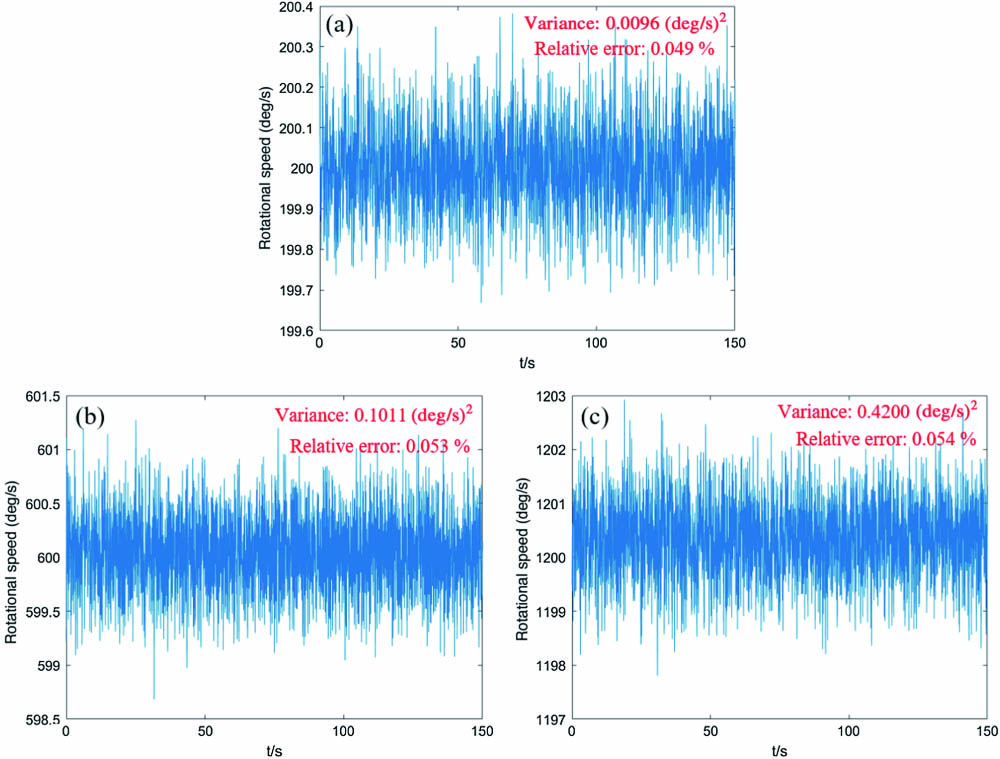
Fig. 4. Results of rotational speed measurement: (a) 200 deg/s, (b) 600 deg/s, and (c) 1200 deg/s.
It can be seen from Fig. 4 that the measurement results of the tachometer fluctuate within a very small range centered on the set value of the turntable. The variances of measurement data are , , and , respectively. Using the evaluation standard ( is the sample standard deviation, and is sample mean), the relative errors of the rotational speed measurement under three rotational speed conditions are 0.049%, 0.053%, and 0.054%, respectively. Therefore, the tachometer designed in this paper has good accuracy and stability.
3.2 Radius sensitivity experiment
The rotational speed of the turntable is set to , and one and two long strips of foam are put on the turntable’s circumference to change the radius, as shown in Figs. 5(a) and 5(b), respectively. The measurement results under the two conditions are compared with that of normal conditions, as shown in Fig. 6. In particular, adding foam also changes the state of the circumferential surface of the turntable, and the change is also one form of radius fluctuation (just a small fluctuation), so the effect of the experiment will not be influenced. There will be an optimization experiment that only changes the circumferential surface state of the turntable by sticking sandpaper in Section 3.4.
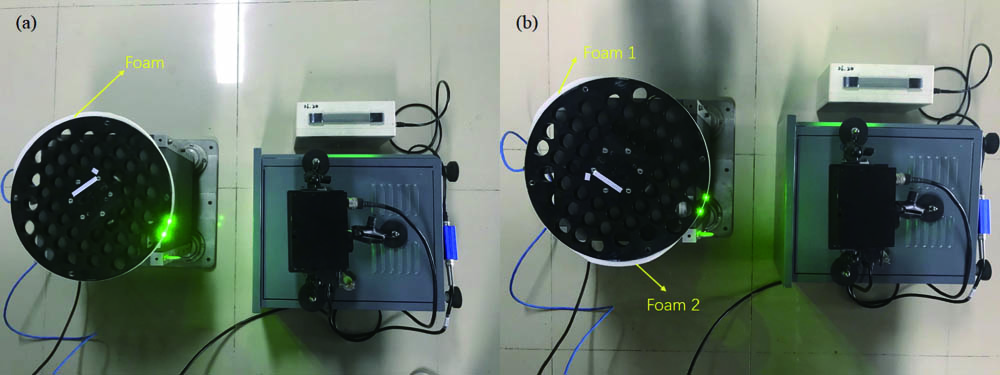
Fig. 5. Photo of radius sensitivity experiment: (a) a piece of foam, (b) two pieces of foam.
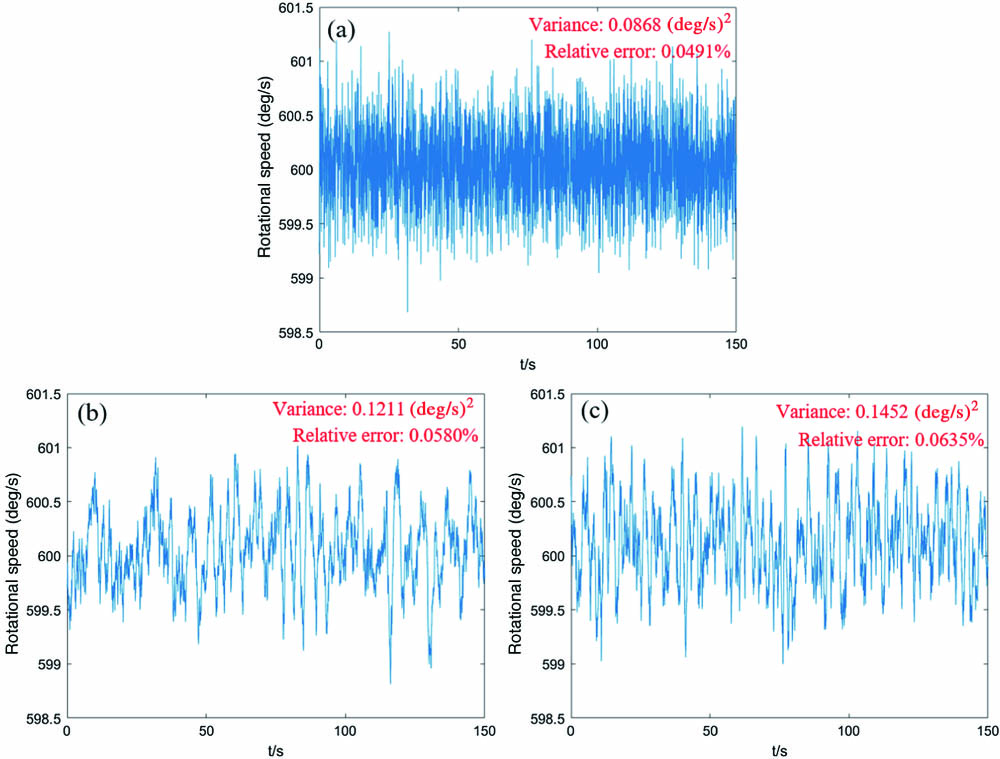
Fig. 6. Results of rotational speed measurement: (a) no foam, (b) a piece of foam, and (c) two pieces of foam.
Figures 6(a)–6(c) show the measurement results of the tachometer under three conditions when the turntable’s speed is . First, comparing Figs. 6(a)−6(c), it will be intuitively found that the data without the attached foam is denser than that with the attached foam. The reason is that the two ends of the foam in the experiment are wedge-shaped, resulting in continuous changes of radius rather than abrupt changes. Therefore, the measurement data with strip foam will rise and fall as a whole, which seems sparse intuitively, but this will not have a large impact on the measurement accuracy.
The variances of three sets of data are , , and , respectively. Therefore, with the change of the turntable’s radius (the number of strip foam causes the intensity of the change in the radius), the fluctuation of the measurement results increases slightly, and the overall is concentrated. The relative errors under the three installation conditions are 0.0491%, 0.058%, and 0.0635%, respectively, all of which are around 0.05%. Therefore, the change of the turntable’s radius has little effect on the tachometer’s measurement accuracy.
3.3 Angle sensitivity experiment
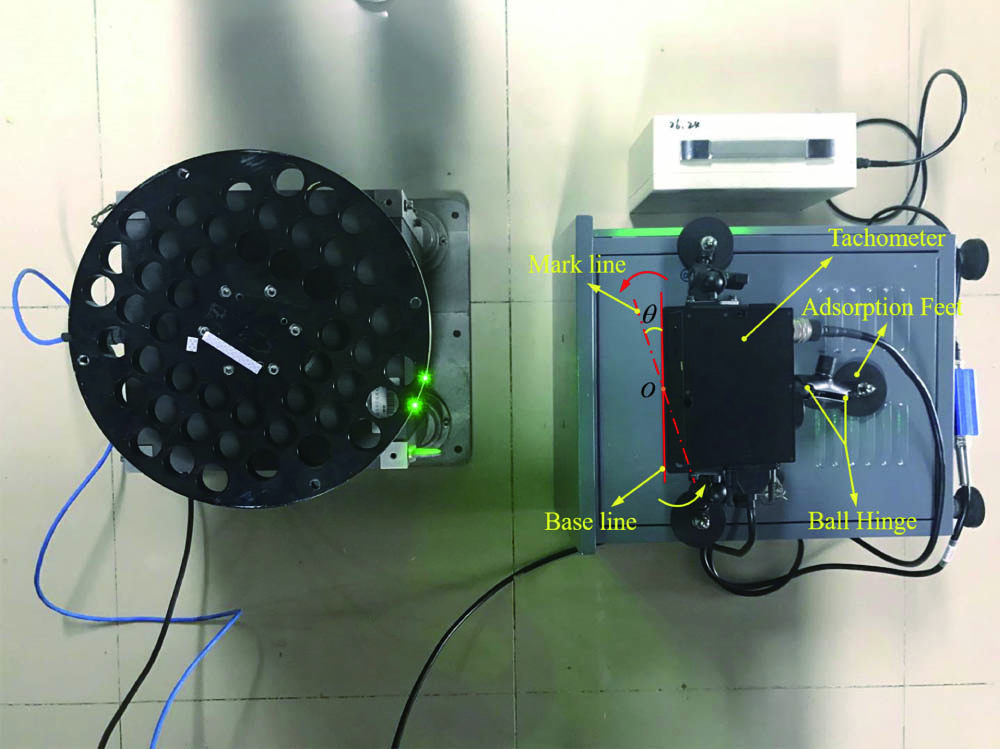
The rotational speed of the turntable is also set to , and the tachometer is installed normally (0 deg), deflection 5 deg and deflection 10 deg, respectively, in the horizontal plane (Fig. 7). The measurement results at three positions are obtained, as shown in Fig. 8.
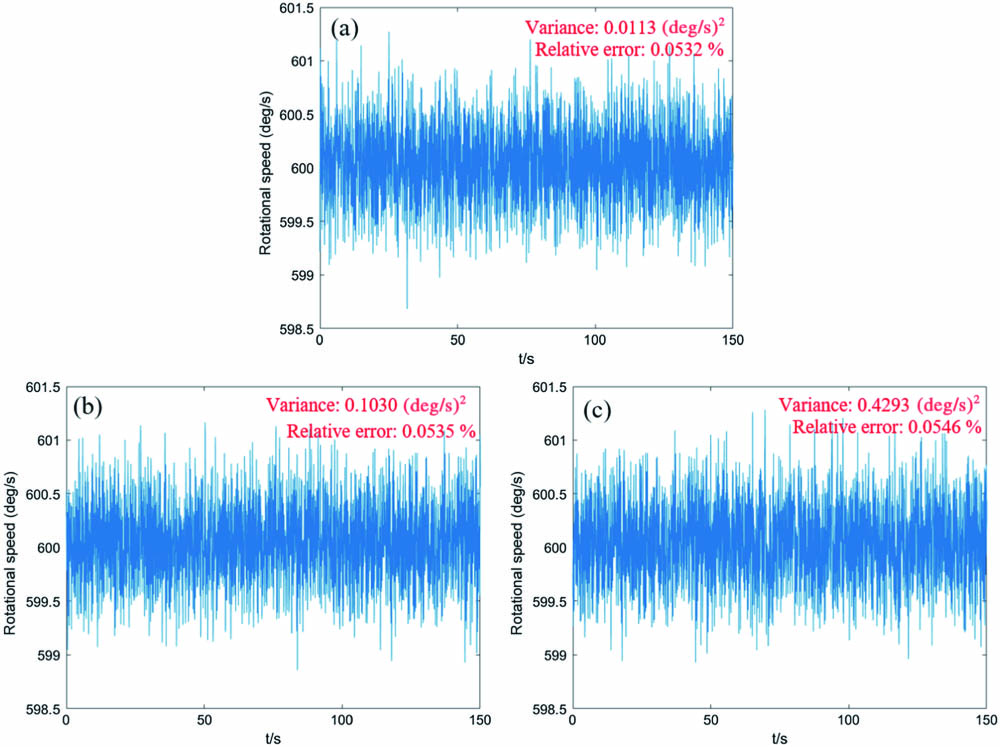
Fig. 8. Results of rotational speed measurement: (a) deflection 0 deg, (b) deflection 5 deg, and (c) deflection 10 deg.
The tachometer is fixed on the chassis through a small tripod, and the initial position of the tachometer’s edge is marked as the baseline position shown in Fig. 7 with a marker pen. Then, the tachometer is rotated slightly in the horizontal plane after loosening the ball joint compression switches on both sides of the tripod, and the edge position can be determined using the marker and protractor until the edge reaches the desired deflection angle position. Next, the ball hinge switch can be closed. In particular, the accuracy requirements for the deflection angle are not very high, because the purpose of the angle sensitivity experiment is to verify that the deflection angle has no effect on the measurement accuracy of the tachometer.
Figures 8(a)–8(c) show the measurement results of the tachometer under three installation angles when the turntable’s speed is set to , and the corresponding variances are , , and , respectively. Therefore, with the increase of the tachometer’s installation deflection angle, the fluctuation degree of the measurement result increases slightly, and the overall is concentrated. Similarly, the corresponding relative errors are 0.0532%, 0.0535%, and 0.0546%, respectively, which are slightly greater than 0.05%. Therefore, the installation deflection angle of the tachometer has little effect on its measurement accuracy.
3.4 Supplementary optimization of performance evaluation experiments
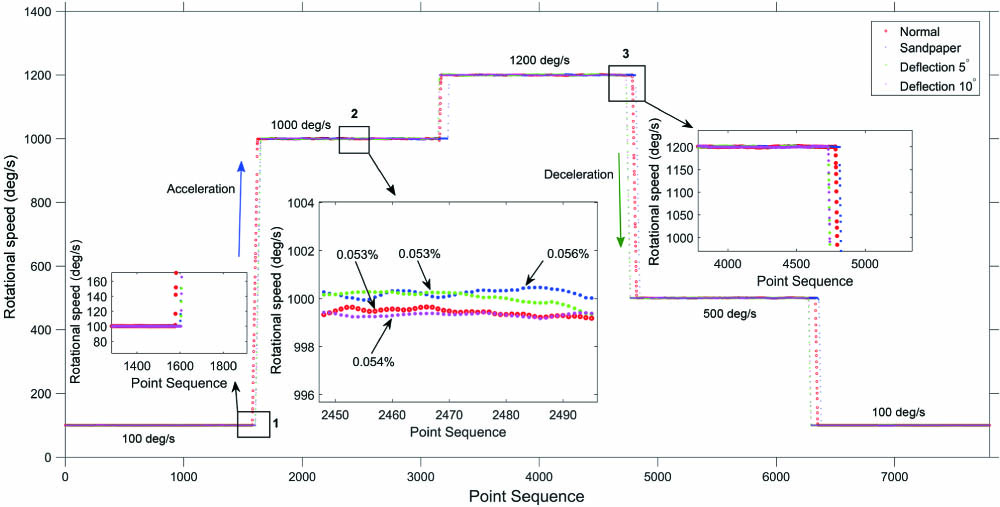
In order to verify the advantages of the tachometer in terms of accuracy, applicability, and real-time performance more comprehensively, an optimization experiment is carried out: we adjust the rotational speed of the turntable manually as , and each speed level is maintained for about 30 s. Finally, the tachometer’s measurement results of the whole process are obtained, as shown in Fig. 9.
Figure 9 contains the measurement results under four working conditions, which are the normal measurement state, the sandpaper on the circumference of the turntable, the tachometer deflection , and the tachometer deflection . The sandpaper is to change the roundness of the turntable, which corresponds to the radius change condition in Section 3.2, and also to ensure the consistency of the circumferential surface state during the radius change. This can further improve and verify the conclusion of Section 3.2. It can be seen intuitively from Fig. 9 that the tachometer can measure the rotational speed in real time (including acceleration and deceleration processes) under each working condition during the entire speed change process. The density of data points depends on the sampling frequency. In particular, since the speed state is manually adjusted in the experiment, the starting moments of acceleration and deceleration under four working conditions are different, so the changing moments of the data points obtained by the tachometer in the figure are different (as can be seen from the enlarged views 1 and 3 in Fig. 9).
Taking the measurement results at a constant speed of as the analysis object and magnifying the certain part, we can intuitively see that the measurement result of the tachometer under the four working conditions is relatively stable overall, and the relative errors of measurement are 0.053%, 0.056%, 0.053%, and 0.054%, respectively, which are all less than 0.06%. Therefore, the accuracy and stability of the tachometer in this paper are high, and it is not sensitive to radius fluctuation and angular deflection.
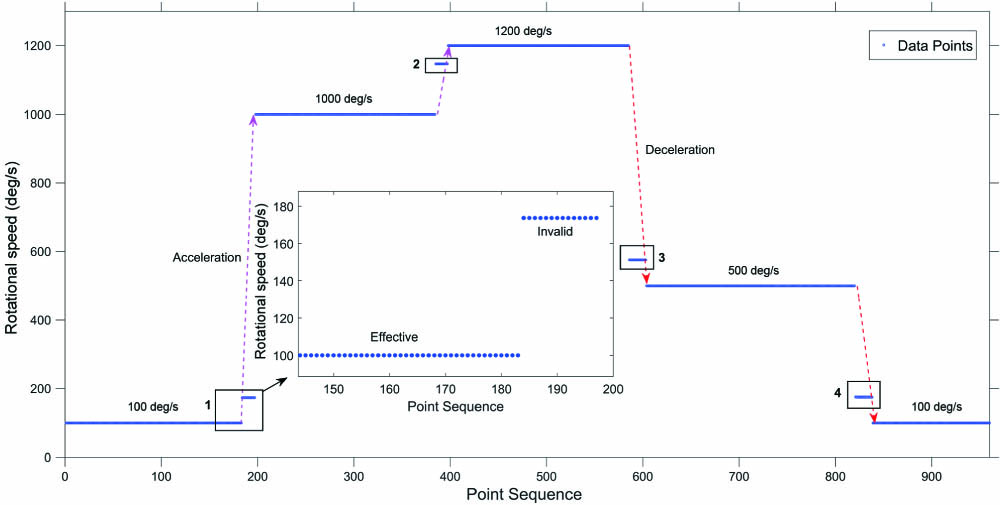
In order to verify whether the result of the tachometer is accurate compared to the turntable’s setting value, a hand-held tachometer is used. The results are shown in Fig. 10. Because the hand-held tachometer calculates the average rotational speed based on the rotation times (pulse number) of the target paper on the circumference of the turntable in a certain period, it can measure the speed normally during the uniform speed stage, and the measurement results are basically consistent with the novel tachometer. The relative measurement error is the same as the traditional pulse counting method (not high enough). In the acceleration phase, the measurement result of the hand-held tachometer is a series of invalid data points, as shown in Fig. 10 and partially enlarged view No. 1. In addition, the data points marked 2, 3, and 4 are also invalid data points during the acceleration and deceleration phases.
Therefore, compared with the traditional rotational speed measurement method, the tachometer in this paper not only improves the measurement accuracy, but also improves the real-time performance of the speed measurement. It is more practical.
Although the accuracy of the novel tachometer is high, and it will not be influenced by the radius fluctuation and the installation angle deviation, other factors that affect the measurement accuracy still exist. To improve the tachometer’s accuracy effectively in the future, we make a simple analysis of these factors as follows.
Considering the influence of air refractive index, Eq. (9) can be transformed into
Taking the full differential of Eq. (11) and performing simple transformation, we can obtain the equation
According to Eq. (12), we can know that the factors that will affect the accuracy of the proposed tachometer include the Doppler frequency spectrum, the change of the refractive index of air, the error of the distance between the parallel beams, and the line width of the laser. The calculation of relative error caused by each factor has been discussed in detail in our previous work[20], and the factor that has the greatest impact on accuracy is the Doppler frequency spectrum widening. The frequency spectrum widening is mainly caused by the finite transit time, the detector’s aperture, and the signal processing algorithm
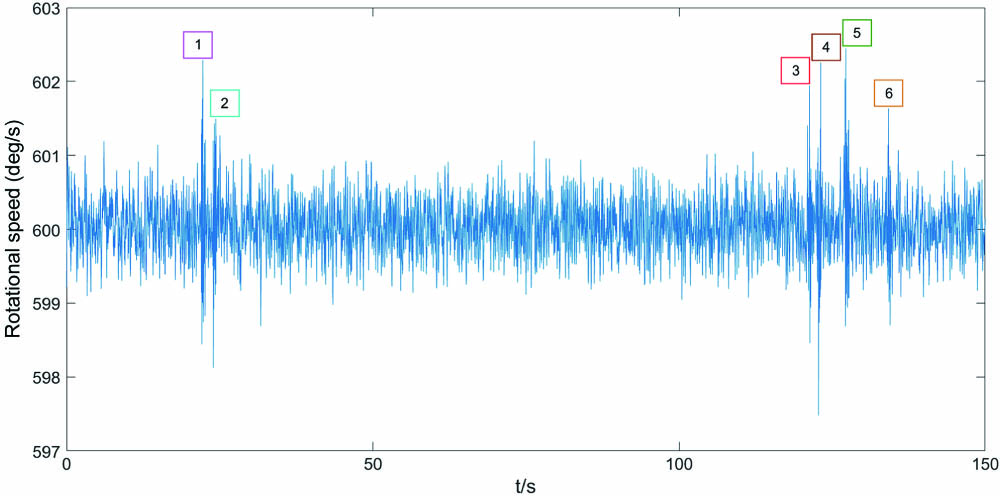
In addition, the environment vibrations can also affect the accuracy, because they will lead to the relative motion of the measuring system and the measured object. Therefore, we conduct the vibration influence experiment to verify this point, and Fig. 11 is the measurement result under the environmental vibrations (we tap the framework six times randomly and intermittently). The measured rotational speed fluctuates at each beat obviously. Therefore, the necessary vibration suppression measures are needed in future applications.
4. Conclusion
A laser Doppler tachometer is developed based on parallel beams in this paper. Compared with the traditional contact method, this tachometer does not need the sensors installed on the measured rotating body directly, which belongs to the non-contact method, and there is no quantization error of the counting pulse in actual usage. So, this tachometer improves the measurement accuracy and convenience. At the same time, the deviation of the measuring system’s installation angle will not have a greater impact on the measurement accuracy when comparing with the common measurement method. In addition, it can output the rotational speed of the rotating body in real time without the angular conversion based on radius, so the measurement error caused by the radius’s fluctuation of the measured rotating body can be avoided. The relative error of the rotational speed measurement is less than 0.06% ().
[1] H. Wu, C. Chen, C. Li, X. Wang. New method of speed measurement based on PSD. J. Electron. Meas. Instrum., 2014, 28: 1033.
[4] Z. Zhou, R. Li, H. Li. Research on high precision measurement system of rotation rate. Meas. Control Technol., 2000, 19: 60.
[6] Q. Chen, L. Xue, H. Rao. Rotational speed measurement of ring spinning based on magnetic sensor. Meas. Sci. Technol., 2017, 28.
[12] P. Xiao, J. Zhou. Application of referenced light laser Doppler velocimeter in rotation speed measurement of rotator. Chn. Sci. Technol. Inf., 2012, 18: 50.
[14] C. Qing, B. Gao, T. Dong, H. Li, S. Yin, C. Jiang, P. Chen. Rotation speed measurement based on self-mixing speckle autocorrelation spectrum. Optik, 2019, 208: 164117.
[16]
[17] J. Zhou, H. Huang. Application of frequency spectrum refinement and correction technology in laser Doppler velocimeter. Laser Inf., 2010, 40: 2.
[19] H. Zhang, Y. Chen, T. Gen, J. Wu, T. Chen. Study on main factors affecting position detection accuracy of four-quadrant detector. Chin. J. Lasers, 2015, 42: 1217002.
Article Outline
Wentao Li, Jian Zhou. Novel laser Doppler tachometer[J]. Chinese Optics Letters, 2021, 19(1): 011201.
