基于双平面镜双相机组合测量全场变形的方法
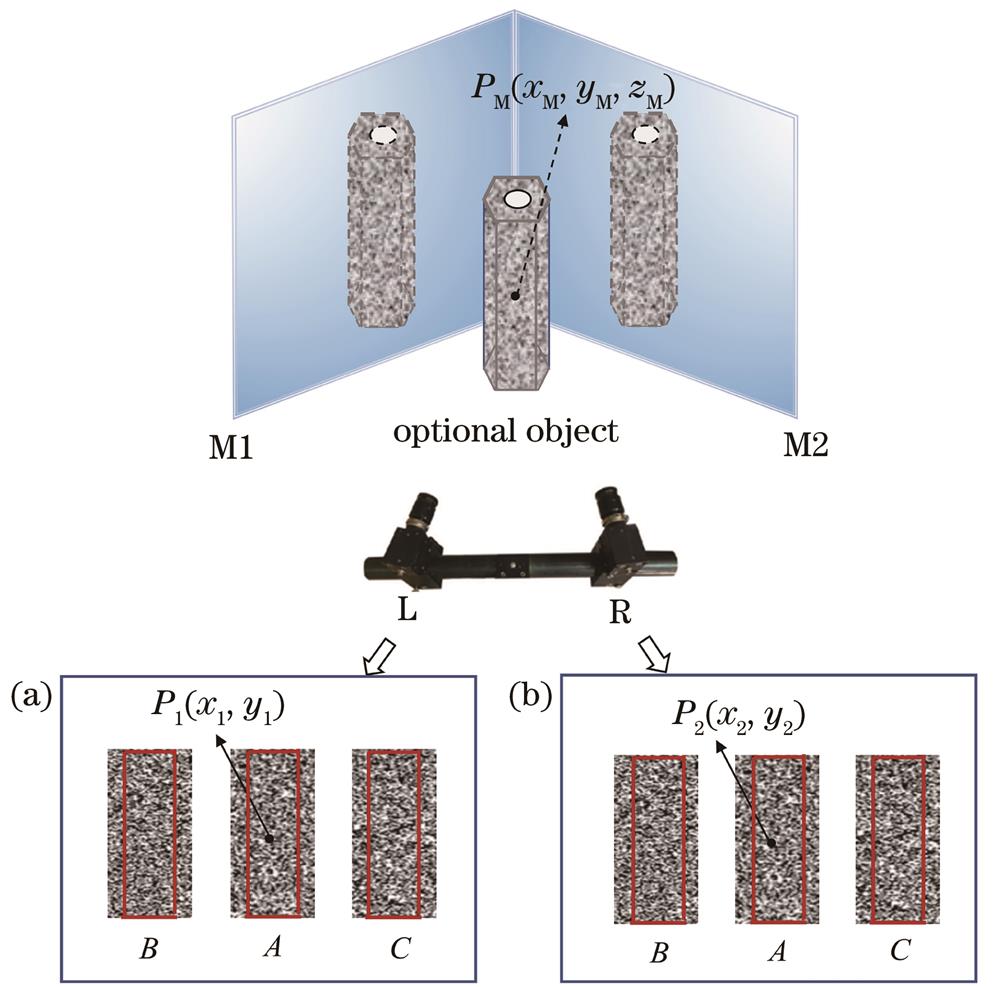
The application of digital image correlation (DIC) technology is very extensive, and the technology has high practical value in biotechnology, civil engineering, aerospace, medical application, and other fields. With the continuous advancement of related technologies, the demand for full-field deformation measurement and 3D shape reconstruction of objects has increased accordingly. This requires the DIC technology to not only have higher measurement accuracy but also be more economical and practical, so as to make itself be applied to more fields. In recent years, many scholars have done a lot of research on the full field strain and deformation measurement by DIC, and they have made many valuable research results. Among them, the multi-camera DIC system has been proven to have high measurement accuracy, and it is feasible to achieve full field or double surface deformation measurement. However, in actual use, the system takes a long time to be built and involves a complex operation and high economic costs, and there is interference between multiple cameras. The rotation of a single camera is used to realize the full field deformation measurement of the measured object under different load conditions. In other words, the camera is continuously moved to rotate around the same measured object, and it will shoot and record in multiple different positions, so as to finally cover all the required fields of view. The system has low cost, complex operation, and low accuracy. In view of the problem that a monocular camera is difficult to be used in full-field deformation measurement and the complexity of multiple cameras in full-field deformation measurement, a new method of full-field deformation measurement by using a double-sided mirror-assisted dual-camera system is proposed.
This research adopts a coordinate transformation method based on camera calibration. In other words, the transformation from the real camera coordinate system to the virtual camera coordinate system is realized through the double-sided mirror, and then the transformation from the real object to the virtual image is realized. It is assumed that the camera coordinate system of L coincides with the world coordinate system of the binocular DIC system (Fig. 3). Therefore, the conversion relationship between the world coordinate system of the virtual binocular DIC system and that of the real binocular DIC system is equivalent to the conversion relationship between the camera coordinate systems of L′ and L. First, it is necessary to find out the positional relationship between the coordinate system oc-xcyczc and the O1-X1Y1Z1. The rotation and translation matrices between the camera coordinate system oc-xcyczc and O1-X1Y1Z1 can be obtained through camera calibration. Then, an intermediate coordinate system is introduced, namely, the coordinate system O2-X2Y2Z2, which is a rotating coordinate system of O1-X1Y1Z1. According to the imaging law of the plane mirror and the nature of the Euler angle, the rotation and translation matrices from the coordinate system ov-xvyvzv to the coordinate system O2-X2Y2Z2 can be obtained, and then the rotation and translation matrices from the coordinate system ov-xvyvzv to the coordinate system O1-X1Y1Z1 can be obtained. Finally, the conversion relationship between the real camera coordinate system and the virtual camera coordinate system can be calculated by synthesizing the above results.
A new method of full field deformation measurement using a double-sided mirror-assisted binocular DIC system is proposed. With a hollow hexagonal aluminum bar as the measuring object, the thermal deformation results of three outer surfaces are measured during the cooling process from 310 ℃ to 20 ℃, and they are compared with the simulation results of the finite element software. The results show that the change curves of the three outer surfaces of the part along the height direction basically coincide with the simulation results, and the absolute error between the calculated average thermal deformation values of A, B, and C surfaces along the height direction of the part by using the proposed method and the simulation results is 2.8 μm. The relative error is only 0.51%. It can be seen that the proposed method not only overcomes the limitation that a monocular camera cannot realize full field measurement but also discards the complexity of a multi-camera DIC system.
李桂华, 李涛, 孙卫庆, 龚启诚, 王晓宇, 张梅. 基于双平面镜双相机组合测量全场变形的方法[J]. 光学学报, 2023, 43(2): 0212007. Guihua Li, Tao Li, Weiqing Sun, Qicheng Gong, Xiaoyu Wang, Mei Zhang. Method for Measuring Full-Field Deformation Based on Double-Sided Mirror and Dual-Camera Combination[J]. Acta Optica Sinica, 2023, 43(2): 0212007.


