基于双平面镜双相机组合测量全场变形的方法
The application of digital image correlation (DIC) technology is very extensive, and the technology has high practical value in biotechnology, civil engineering, aerospace, medical application, and other fields. With the continuous advancement of related technologies, the demand for full-field deformation measurement and 3D shape reconstruction of objects has increased accordingly. This requires the DIC technology to not only have higher measurement accuracy but also be more economical and practical, so as to make itself be applied to more fields. In recent years, many scholars have done a lot of research on the full field strain and deformation measurement by DIC, and they have made many valuable research results. Among them, the multi-camera DIC system has been proven to have high measurement accuracy, and it is feasible to achieve full field or double surface deformation measurement. However, in actual use, the system takes a long time to be built and involves a complex operation and high economic costs, and there is interference between multiple cameras. The rotation of a single camera is used to realize the full field deformation measurement of the measured object under different load conditions. In other words, the camera is continuously moved to rotate around the same measured object, and it will shoot and record in multiple different positions, so as to finally cover all the required fields of view. The system has low cost, complex operation, and low accuracy. In view of the problem that a monocular camera is difficult to be used in full-field deformation measurement and the complexity of multiple cameras in full-field deformation measurement, a new method of full-field deformation measurement by using a double-sided mirror-assisted dual-camera system is proposed.
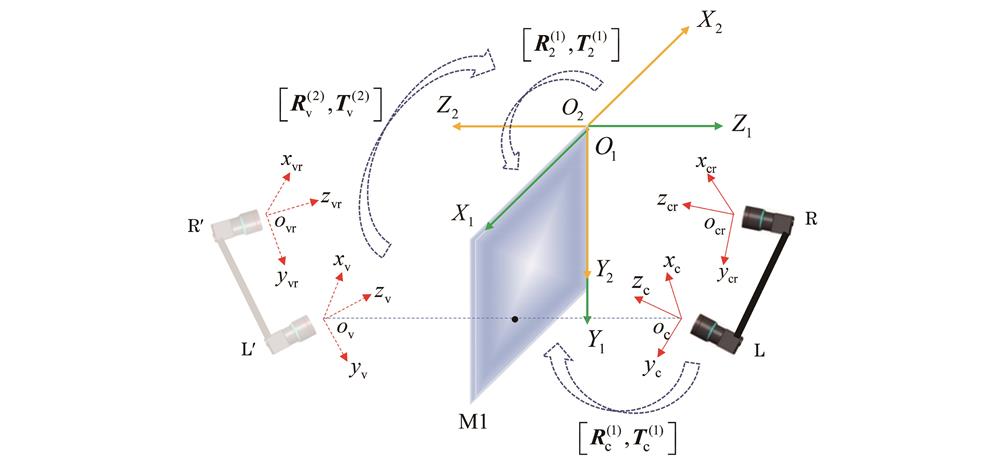
This research adopts a coordinate transformation method based on camera calibration. In other words, the transformation from the real camera coordinate system to the virtual camera coordinate system is realized through the double-sided mirror, and then the transformation from the real object to the virtual image is realized. It is assumed that the camera coordinate system of L coincides with the world coordinate system of the binocular DIC system (Fig. 3). Therefore, the conversion relationship between the world coordinate system of the virtual binocular DIC system and that of the real binocular DIC system is equivalent to the conversion relationship between the camera coordinate systems of L′ and L. First, it is necessary to find out the positional relationship between the coordinate system oc-xcyczc and the O1-X1Y1Z1. The rotation and translation matrices between the camera coordinate system oc-xcyczc and O1-X1Y1Z1 can be obtained through camera calibration. Then, an intermediate coordinate system is introduced, namely, the coordinate system O2-X2Y2Z2, which is a rotating coordinate system of O1-X1Y1Z1. According to the imaging law of the plane mirror and the nature of the Euler angle, the rotation and translation matrices from the coordinate system ov-xvyvzv to the coordinate system O2-X2Y2Z2 can be obtained, and then the rotation and translation matrices from the coordinate system ov-xvyvzv to the coordinate system O1-X1Y1Z1 can be obtained. Finally, the conversion relationship between the real camera coordinate system and the virtual camera coordinate system can be calculated by synthesizing the above results.
A new method of full field deformation measurement using a double-sided mirror-assisted binocular DIC system is proposed. With a hollow hexagonal aluminum bar as the measuring object, the thermal deformation results of three outer surfaces are measured during the cooling process from 310 ℃ to 20 ℃, and they are compared with the simulation results of the finite element software. The results show that the change curves of the three outer surfaces of the part along the height direction basically coincide with the simulation results, and the absolute error between the calculated average thermal deformation values of A, B, and C surfaces along the height direction of the part by using the proposed method and the simulation results is 2.8 μm. The relative error is only 0.51%. It can be seen that the proposed method not only overcomes the limitation that a monocular camera cannot realize full field measurement but also discards the complexity of a multi-camera DIC system.
1 引言
数字图像相关(DIC)技术已有近四十年的发展史[1-4],其应用非常广泛,在生物技术、土木工程、航空航天、医学应用等领域有着很高的实用价值。随着相关技术的不断推进,对物体全场变形测量和三维形貌重建的需求也相应提升。这不仅要求DIC技术有较高的测量精度,也需要该技术更加经济实用,可以推广到更多的应用领域。
近年来,不少学者在DIC实现全场应变和变形测量方面进行了大量研究,也取得了很多有价值的研究结果[5-12]。其中,多相机DIC系统被证明有较高的测量精度,对实现全场或双表面变形测量有较高的可行性。Orteu等[13]将这一类技术称为多视角DIC(MV-DIC),并开发了以“主摄像机”配置为基础的MV-DIC系统。该系统包括4个同步摄像机,其中一个摄像机被定义为“主摄像机”,其余的摄像机均与主摄像机有公共视场,通过两两匹配,实现全场测量。由于摄像机之间要有公共视场,因此该系统的测量范围受限。Li等[14]随后提出以“面对面的相机对”配置为基础的MV-DIC系统,即系统包含4个相机,每2个相机构成一个常规双目DIC系统,且2对相机处于同一高度左、右位置。该方法实现较简单,可实现应力-应变的大范围测量。但是,在以多相机搭建的MV-DIC系统中仍存在视场受限问题,为此一些学者提出使用更多的相机来扩大相机视场[15-18]。在实际使用时,系统的搭建时间长,操作复杂,经济成本较高,多相机之间时有干扰。针对此类问题,Spera等[19]提出使用单台相机旋转实现对被测对象在不同载荷情况下的全场变形测量,即连续移动这台相机围绕同一被测对象旋转,并在多个不同位置进行拍摄记录,最终覆盖全部所需视场。Badel等[20]提出保持单台相机固定,让放在旋转平台上的被测样品按照一定速度旋转,由这台相机分别拍摄被测样品变形前后的图像序列,并对图像序列进行处理,从而实现对被测样品的全景变形测量。上述两种方法利用单台相机构成多个伪相机,简化DIC系统搭建流程,降低经济成本。另外,Barone等[21]将相机、投影仪、球面镜结合,将投影仪发出的结构光通过球面镜投影到被测对象上,重建了不同被测对象的表面形状。Pan等[22-23]提出双目DIC测量系统,利用反射镜上预先制作的散斑图案,可以检索两个反射镜的反射变换,并将重建的虚拟曲面转换为其在反射镜前面的真实位置。鉴于MV-DIC系统和单相机系统在测量精度和经济成本上存在的矛盾,有必要设计一种兼顾精度和成本的方案,即使用较少的相机实现多目DIC系统的功能。本文提出一种利用平面镜辅助双目DIC系统实现全场变形测量的新方法。该方法通过相机标定的坐标变换方法,得到镜面虚实像点之间的坐标变换关系,实现被测件的三维重构和全场变形测量,在提高DIC系统测量精度的基础上,不增加CCD相机数量。
2 镜面辅助双目DIC系统
2.1 系统配置和基本原理
搭建的镜面辅助双目DIC系统如
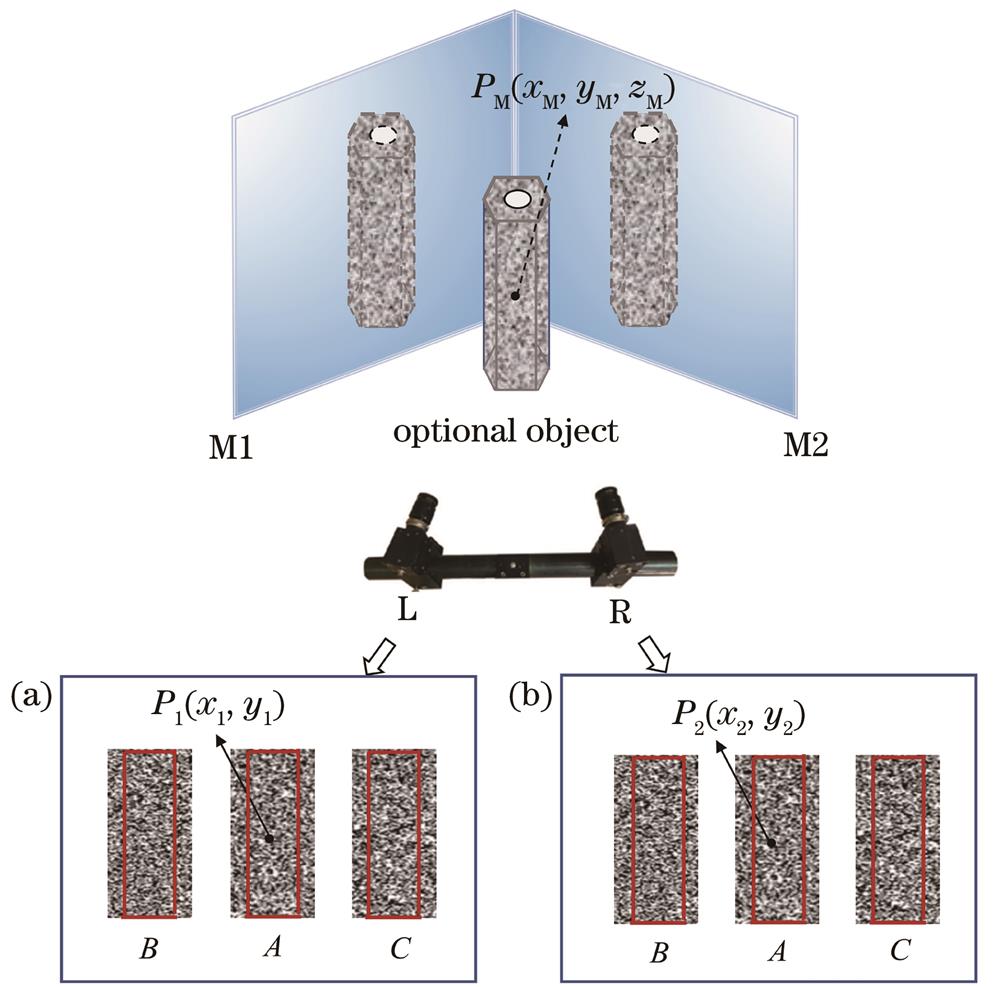
图 1. 镜面辅助双目DIC系统的原理图。(a)左相机视图;(b)右相机视图
Fig. 1. Schematic of mirror-assisted binocular DIC system.(a) Left camera view; (b) right camera view
2.2 基于双目DIC的三维重建
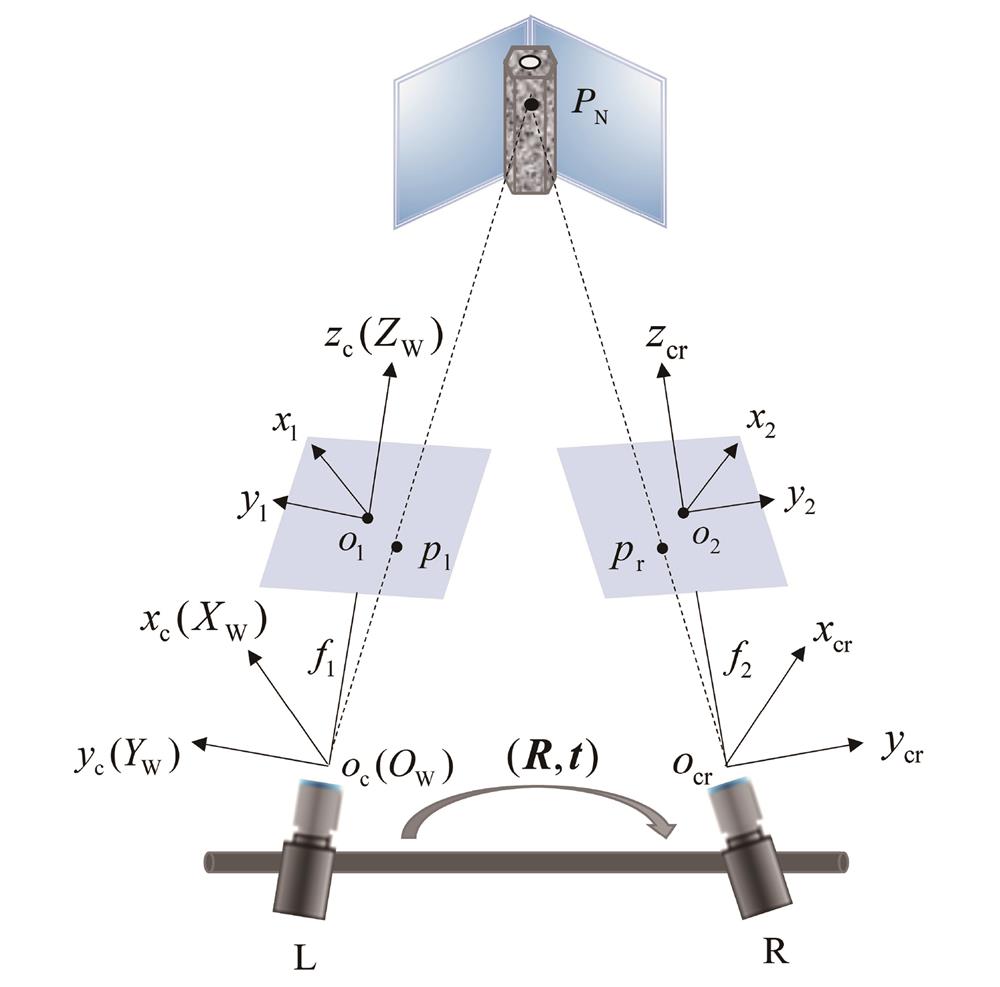
在双目DIC系统中,两个相机从不同位置拍摄到被测物体的同一公共区域,类似于人眼的成像原理,其数学模型如
采用棋盘格标定板[24]可以方便地确定每个相机的内部参数,以及R相对于世界坐标系的旋转矩阵和平移矩阵。由
式中:
对于一般的工业相机,二阶畸变校正即可满足对图像的校正。然而,所提方法的目的之一是实现双相机的标定,每个视角下的图像质量对系统的测量精度都有影响,有必要考虑更高阶的畸变系数。因此,所提方法采用非线性成像模型,综合考虑畸变校正效率,将径向畸变系数提高为三阶。
径向畸变校正模型为
式中:
切向畸变校正模型为
式中:
一般工业相机采用一阶校正系数
对于L、R的相机坐标系,有如下关系:
式中:
上述过程完成了对所有相机参数的初步估计。双相机DIC系统对标定精度要求较高,单个相机的高质量标定并不能有效提高系统的性能,多坐标系转换过程中会有误差的积累,需要对双相机的全局标定结果做进一步优化来提高系统的标定精度。捆绑调整(BA)是一种常用的全局优化方案,常用的优化算法有最速下降法、牛顿法、Levenberg-Marquardt(LM)法。其中,LM法结合了另外两种方法的优点,计算速度快、不受初始值的限制。所提方法选择LM法对全局标定参数进行优化,以重投影误差表示的最小代价函数形式为
式中:
将
2.3 基于双相机标定的镜面反射变换
为了实现被测物体的三维重建,需要知道
由
首先需要找出坐标系
得到相机坐标系
相应地,平移矩阵可表示为
在得到坐标系
由
根据
计算出中间坐标系
联立式(
由于旋转矩阵为单位正交矩阵,故
故虚像到实像的旋转和平移矩阵为
3 实验和结果
3.1 实验装置
实验以空心六角铝棒零件为研究对象,用所提方法对其热变形进行研究。双平面镜辅助双目DIC系统的实验装置如
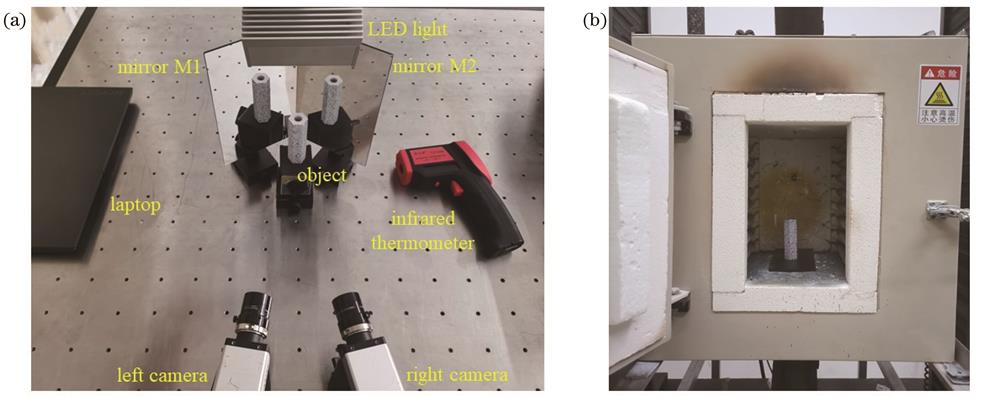
图 4. 实验装置示意图。(a)主要设备;(b)高温炉实物图
Fig. 4. Schematic of experimental setup. (a) Main equipment; (b) physical map of high temperature furnace
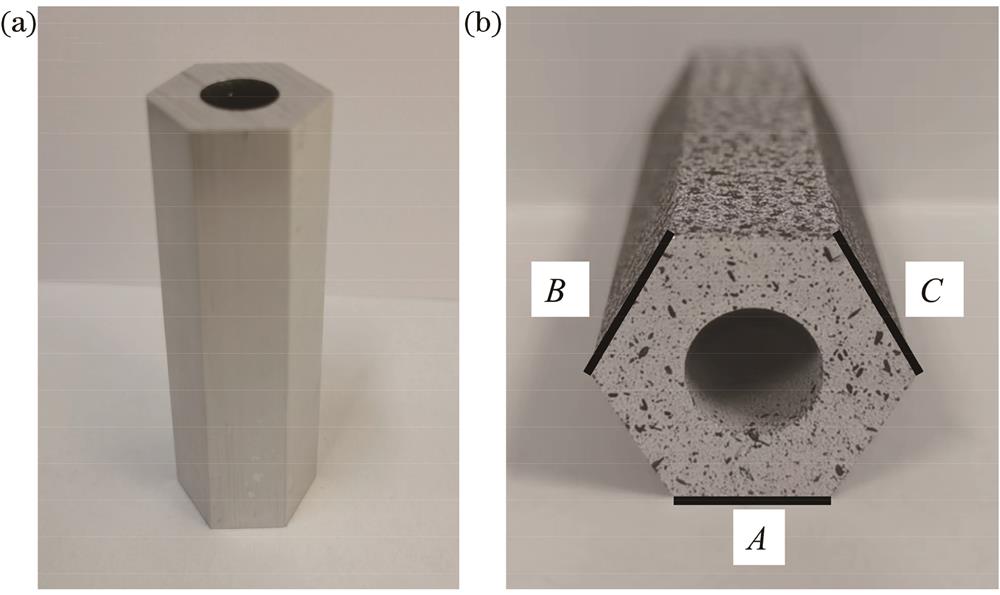
图 5. 零件的实物图。(a)原型图;(b)三个侧面示意图
Fig. 5. Physical map of the part. (a) Prototype diagram; (b) three side schematic
3.2 实验过程
实验前,将加热前的零件置于
3.3 实验结果
3.3.1 三维重建结果
通过相机标定,且已知标定板的厚度为2 mm,由所提方法可得到左平面镜中虚像到实像的旋转矩阵为
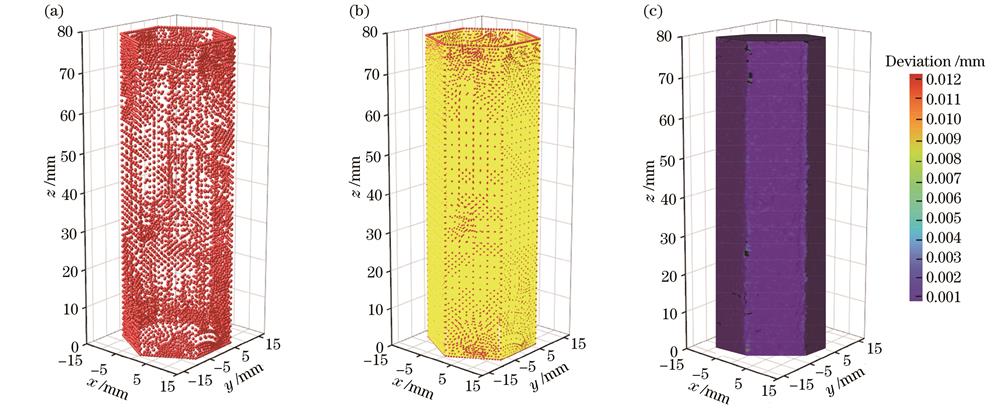
图 6. 零件外表面的重建过程。(a)三维散点图;(b)三维轮廓效果图;(c)三维重建表面与拟合曲面偏差云图
Fig. 6. Reconstruction process of outer surface of the part. (a) 3D scatter plot; (b) 3D outline sketch; (c) 3D reconstruction of the surface versus the fitted surface deviation cloud map
重建表面与拟合表面的偏差如
3.3.2 热变形测量结果
参考图像为310 ℃时采集到的零件图像,目标图像为20 ℃时采集到的零件图像。以y方向上的两个中间边缘点M、N作为零件在y方向上的两个特征点,M、N之间的距离即为零件的高度,如
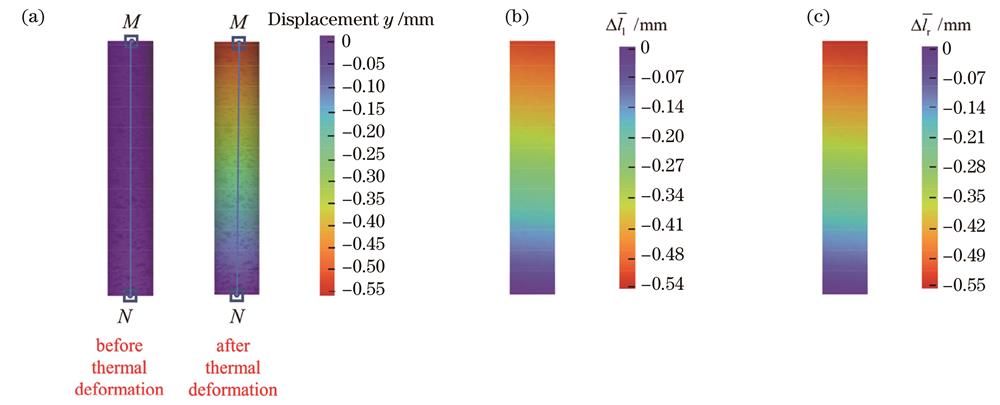
图 7. 零件3个外侧表面的热变形结果。(a)零件A面热变形前(310 ℃)和热变形后(20 ℃)的位移云图;(b)零件B面的热变形后位移云图;(c)零件C面的热变形后位移云图
Fig. 7. Thermal deformation results of three outer surfaces of the part. (a) Displacement cloud diagram of part A surface before (310 ℃) and after (20 ℃) thermal deformation; (b) displacement cloud diagram of part B surface after thermal deformation; (c) displacement cloud diagram of part C surface after thermal deformation
表 1. 起止温度下零件A面、B面和C面的高
Table 1. Height of parts A, B, and C at starting and ending temperatures
|
对于零件的B、C面,由于所拍摄的是经平面镜所成的虚像,从系统导出虚像点的坐标,再用所提方法进行虚实转换,将虚像点转换成双目立体DIC系统的世界坐标系下的实像点,最后进行热变形的计算。用所提方法可以分别得到零件B、C面竖直方向上第一帧和最后一帧图像的高度平均值,结果如
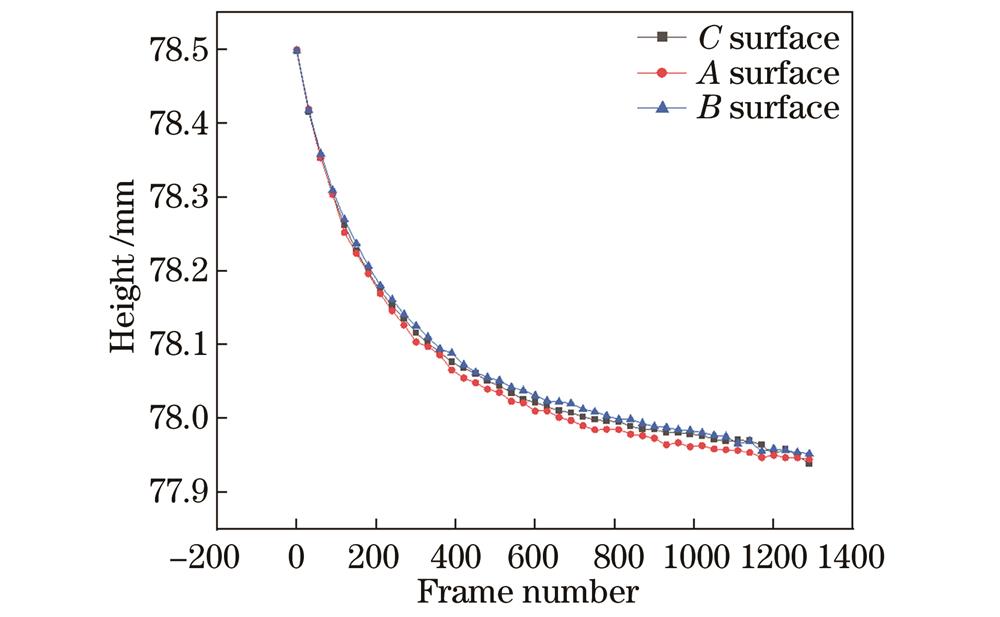
图 8. 降温过程零件A面、B面和C面高的变化曲线
Fig. 8. Variation curves of heights of surfaces A, B, and C during the cooling process
3.3.3 热变形仿真结果
为验证所提方法在热变形测量中的可行性和准确性,用ANSYS软件对零件的热变形过程进行仿真,空心六角铝棒零件的物理参数如
表 2. 铝的物理参数
Table 2. Physical parameters of aluminum
|
使用有限元分析软件ANSYS对零件进行网格划分,综合考虑精度和效率后,设置网格单元边长为1 mm,共得到31600个四面体网格,如
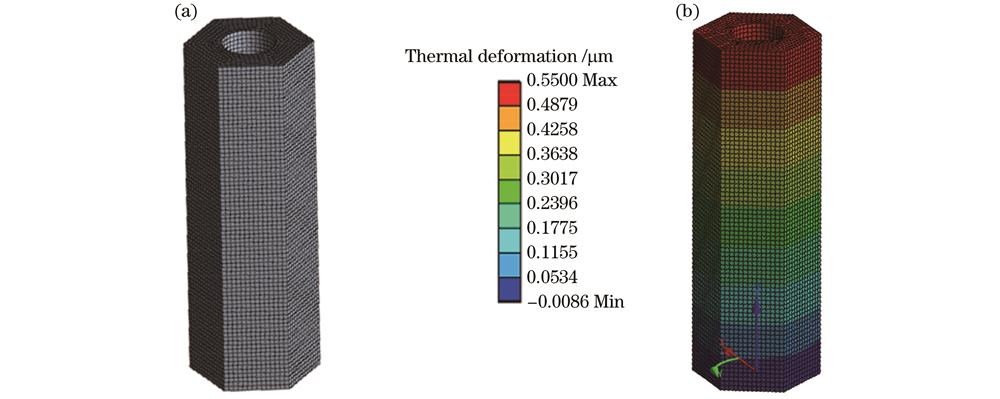
图 9. 利用ANSYS对零件进行网格划分及热变形仿真。(a)零件的有限元网格划分图;(b)零件热变形仿真结果
Fig. 9. Meshing diagram and thermal deformation simulation on the part by ANSYS. (a) Finite element meshing diagram of the part; (b) simulation result of thermal deformation of the part
4 结论
提出一种利用双平面镜辅助双目DIC系统来实现全场变形测量的新方法,并以空心六角铝棒零件为测量对象,测量其从310 ℃冷却至20 ℃过程中3个外侧表面的热变形结果,并与有限元软件仿真结果进行对比。结果表明,零件3个外侧表面沿高度方向的变化曲线基本重合,与仿真结果接近,利用所提方法计算得到的零件A、B、C面沿高度方向上的热变形平均值与仿真结果的绝对误差为
[1] 杜鉴昕, 赵加清, 王海涛, 等. 针对裂尖变形场测量的包络单元局部数字图像相关方法[J]. 光学学报, 2022, 42(1): 0112003.
[2] 王凡, 赵亮, 吴晓东, 等. 基于CT及数字图像相关法的混凝土变形场测量分析[J]. 激光与光电子学进展, 2020, 57(20): 200401.
Wang F, Zhao L, Wu X D, et al. Measurement and analysis of concrete deformation field based on CT and digital image correlation method[J]. Laser&Optoelectronics Progress, 2020, 57(20): 200401.
[3] 潘济宇, 张水强, 苏志龙, 等. 基于数字图像相关的水下螺旋桨三维变形测量[J]. 光学学报, 2021, 41(12): 1212001.
[4] Palanca M, Tozzi G, Cristofolini L. The use of digital image correlation in the biomechanical area: a review[J]. International Biomechanics, 2016, 3(1): 1-21.
[5] Yoneyama S, Ueda H. Bridge deflection measurement using digital image correlation with camera movement correction[J]. Materials Transactions, 2012, 53(2): 285-290.
[6] Ji Y, Li Z, Liu L P, et al. A deformation detection method for aircraft skin on uniform pressure by using speckle image correlation technology[J]. Measurement, 2020, 154: 107525.
[7] Tiwari V, Sutton M A, McNeill S R, et al. Application of 3D image correlation for full-field transient plate deformation measurements during blast loading[J]. International Journal of Impact Engineering, 2009, 36(6): 862-874.
[8] Neri P, Paoli A, Razionale A V, et al. Low-speed cameras system for 3D-DIC vibration measurements in the kHz range[J]. Mechanical Systems and Signal Processing, 2022, 162: 108040.
[9] 吴荣, 刘依, 周建民, 等. 数字图像相关在旋转物体全场应变测量中的应用[J]. 光学学报, 2020, 40(13): 1312005.
[10] 朱飞鹏, 陆润之, 白鹏翔, 等. 双反射镜成像用于二维数字图像相关应变精度提升[J]. 光学学报, 2019, 39(12): 1212002.
[11] 单宝华, 霍晓洋, 刘洋. 一种极线约束修正数字图像相关匹配的立体视觉测量方法[J]. 中国激光, 2017, 44(8): 0804003.
[12] 王永红, 朱奕磊, 高启学, 等. 基于数字图像相关法的空间目标位姿测量[J]. 光学学报, 2022, 42(8): 0812001.
[13] Orteu J J, Bugarin F, Harvent J, et al. Multiple-camera instrumentation of a single point incremental forming process pilot for shape and 3D displacement measurements: methodology and results[J]. Experimental Mechanics, 2011, 51(4): 625-639.
[14] Li J R, Yang G B, Siebert T, et al. A method of the direct measurement of the true stress-strain curve over a large strain range using multi-camera digital image correlation[J]. Optics and Lasers in Engineering, 2018, 107: 194-201.
[15] Wang Y Q, Lava P, Coppieters S, et al. Application of a multi-camera stereo DIC set-up to assess strain fields in an erichsen test: methodology and validation[J]. Strain, 2013, 49(2): 190-198.
[16] Malowany K, Malesa M, Kujawińska M, et al. Application of 3D digital image correlation for development and validation of FEM model of self-supporting arch structures[J]. Applied Sciences, 2019, 9(7): 1305.
[17] Denys K, Coppieters S, Seefeldt M, et al. Multi-DIC setup for the identification of a 3D anisotropic yield surface of thick high strength steel using a double perforated specimen[J]. Mechanics of Materials, 2016, 100: 96-108.
[18] Malowany K, Malesa M, Kowaluk T, et al. Multi-camera digital image correlation method with distributed fields of view[J]. Optics and Lasers in Engineering, 2017, 98: 198-204.
[19] Spera D, Genovese K, Voloshin A. Application of stereo-digital image correlation to full-field 3-D deformation measurement of intervertebral disc[J]. Strain, 2011, 47: e572-e587.
[20] Badel P, Genovese K, Avril S. 3D residual stress field in arteries: novel inverse method based on optical full-field measurements[J]. Strain, 2012, 48(6): 528-538.
[21] Barone S, Neri P, Paoli A, et al. Structured light stereo catadioptric scanner based on a spherical mirror[J]. Optics and Lasers in Engineering, 2018, 107: 1-12.
[22] Pan B, Chen B. A novel mirror-assisted multi-view digital image correlation for dual-surface shape and deformation measurements of sheet samples[J]. Optics and Lasers in Engineering, 2019, 121: 512-520.
[23] Bin C, Bing P. Calibrating mirror-assisted multi-view digital image correlation system using a speckled planar object[J]. Measurement Science and Technology, 2021, 32(3): 034008.
[24] Zhang Z Y. A flexible new technique for camera calibration[J]. IEEE Transactions on Pattern Analysis and Machine Intelligence, 2000, 22(11): 1330-1334.
[25] Chen Z N, Shao X X, Xu X Y, et al. Optimized digital speckle patterns for digital image correlation by consideration of both accuracy and efficiency[J]. Applied Optics, 2018, 57(4): 884-893.
Article Outline
李桂华, 李涛, 孙卫庆, 龚启诚, 王晓宇, 张梅. 基于双平面镜双相机组合测量全场变形的方法[J]. 光学学报, 2023, 43(2): 0212007. Guihua Li, Tao Li, Weiqing Sun, Qicheng Gong, Xiaoyu Wang, Mei Zhang. Method for Measuring Full-Field Deformation Based on Double-Sided Mirror and Dual-Camera Combination[J]. Acta Optica Sinica, 2023, 43(2): 0212007.
