铝合金激光清洗表面形貌变化的实验研究及工艺参数优化  下载: 856次
Objective Aluminum alloy is widely used in aerospace, automobile manufacturing, and other fields. An oxide layer easily forms on the surface of aluminum alloy, which seriously affects the welding quality. As a result, there is an urgent need for high-quality removal technology. Compared with traditional cleaning methods, laser cleaning has obvious advantages in cleaning effect and process flexibility. Laser cleaning changes the surface morphology and roughness of aluminum alloy and seriously affects subsequent processing, such as welding and painting. At present, most researchers have only compared the differences in the surface morphology of aluminum alloy before and after laser cleaning. However, they have not systematically explained the reasons for the changes in morphology and roughness. Therefore, this article investigates aluminum alloy to explore the correlation between laser cleaning process parameters and surface morphology and roughness. A laser cleaning process window for the natural oxide layer on the surface of 6061 aluminum alloy was established. Based on this window, the process parameters were optimized to maximize surface roughness, which provides process guidance for adjusting the surface morphology of aluminum alloy.
Methods This article uses a pulsed laser with a maximum power of 100 W (YDFLP-100-LM1) for laser cleaning experiments. The laser wavelength is 1064 nm, and the spot diameter is 70 μm. In this article, the fixed pulse width is 100 ns and the repetition frequency is 100 kHz. This paper uses 6061 aluminum alloy with a thickness of 2 mm as the substrate. Single-factor experiments are used to study the influence of average power, scanning speed, and line spacing on the laser cleaning effect. After laser cleaning, the FEI Sirion 200 scanning electron microscope was used to characterize the surface morphology, the energy spectrometer was utilized to test the changes in surface element content, and the OLYMPUS DSX 510 three-dimensional microscope was employed to test the changes in surface roughness. Furthermore, this paper uses the response surface analysis method to optimize the process parameters within the established process window.
Results and Discussions When the average power is 15 W, only small craters are formed on the surface. Most areas do not have ablation craters of the same size. With an increase in power, apparent crater overlap morphology is gradually formed. When the power is increased to 75 W, the laser energy is too large, resulting in severe thermal ablation, and a large amount of metal splash destroys the lap morphology of the craters. As the power increases from 15 W to 75 W, the roughness increases from 0.608 μm to 1.636 μm. Consequently, the variation in aluminum alloy surface morphology with power can be divided into four stages (Fig.6). Since the scanning speed and line spacing change the positioning between adjacent laser spots, the changes in their surface topography exhibit similar laws. When the scanning speed is 2000 mm/s, and the line spacing is 0.02 mm, the surface is relatively flat, and the overlap marks of the craters are not noticeable. With increased scanning speed and line spacing, the crater morphology with regular arrangement can be observed with an increased degree of morphology fluctuation. As the scanning speed and line spacing increase, the roughness first increases and then decreases. As a result, the change in aluminum alloy surface morphology can be divided into three stages (Fig.10). Through the element content test, with the oxygen content below 2% as the indicator, the laser cleaning process window for the natural oxide layer on the surface of 6061 aluminum alloy is established as follows: the average power is between 30 W and 60 W, the scanning speed is between 3000 mm/s and 5000 mm/s, and the line spacing is between 0.03 mm and 0.05 mm. Based on the response surface analysis method, the function of the surface roughness change after laser cleaning is formulated. According to the analysis of variance results, average power, scanning speed, and line spacing influence roughness in the increasing order of significance. The optimal process parameters obtained theoretically include a laser power of 60 W, a scanning speed of 4950 mm/s, and a line spacing of 0.041 mm. The three verification experiments confirm that the results have high credibility.
Conclusions In this paper, the influence of laser cleaning on the surface morphology of 6061 aluminum alloy was studied. The average power affects the crater morphology, which in turn changes the surface roughness. As the laser power increases, the roughness gradually increases. The scanning speed and line spacing affect the lap morphology of adjacent craters, thereby changing the roughness. As the scanning speed and line spacing increase, the roughness first increases and then decreases. According to the results of the elemental energy spectrum test, it is found that the process parameter window for laser cleaning the natural oxide layer on the surface of 6061 aluminum alloy is as follows: the average power is between 30 W and 60 W, the scanning speed is between 3000 mm/s and 5000 mm/s, and the line spacing is between 0.03 mm and 0.05 mm. Based on this window, a function model for the surface roughness change of 6061 aluminum alloy was established. The process parameters are as follows when the surface roughness reaches the maximum: the average power is 60 W, the scanning speed is 4950 mm/s, and the line spacing is 0.041 mm. Elemental energy spectrum test results demonstrate that the relative content of surface oxygen is less than 1%, which meets industrial application requirements.
1 引言
铝合金具有密度低、比强度高等特点,被广泛应用于航空航天、汽车制造等领域[1-2]。铝合金表面容易生成氧化层,而氧化层会严重影响焊接质量[3-4],因此亟需一种高效的清除技术。激光清洗方法利用脉冲激光的热烧蚀作用去除铝合金表面的氧化层。与传统清洗方法(如机械打磨、化学清洗等)相比,激光清洗在清除效果、工艺柔性等方面具有明显的优势[5],逐渐成为了常用的工业清洗手段。
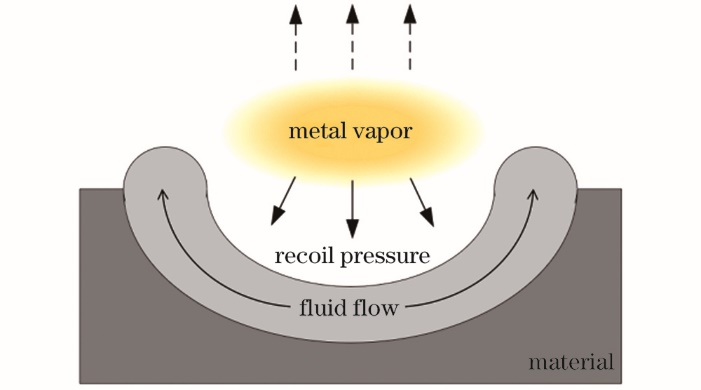
激光清洗处理会明显改变铝合金的表面形貌和粗糙度,从而严重影响焊接、涂装等后续加工。Yousaf等[6]发现激光清洗后,铝合金表面会形成“火山坑”形状的凹坑形貌,且随着激光能量的升高,“火山坑”形貌尺寸先增大后减小。Zheng等[7]根据激光作用机理和凹坑形貌特征,将激光辐照区域划分为烧蚀区、熔化区、沉积区等5部分,并对各区域内的形貌变化机制进行了理论分析。Zhu等[8]发现激光清洗能够显著提升5A12铝合金的表面粗糙度,但并未系统地阐释粗糙度的变化规律。Shi等[9]发现激光清洗处理能够在铝合金表面形成9~30 μm厚的硬化层,该硬化层轻微地提高了基材的拉伸性能和弯曲性能。Zhang等[10-11]建立了材料热力学模型,认为蒸发压力引起的冲击效应导致了凹坑形貌的形成。Liu等[12-14]通过工艺实验发现采用适当的工艺参数清洗后,金属合金表面的粗糙度可以得到一定程度的降低,但并未解释粗糙度降低的原因。文献[ 15-17]通过元素测试获取了铝合金激光清洗的工艺窗口,但并未结合工业应用进一步优化工艺参数。
综上所述,一些学者仅对比了激光清洗前后铝合金表面形貌的差异,但并未系统地解释形貌变化和粗糙度变化的原因。本文以6061铝合金为对象,开展工艺实验。探究了激光清洗工艺参数、表面形貌和粗糙度的关系,建立了6061铝合金表面自然氧化层的激光清洗工艺窗口。基于此窗口,构建了6061铝合金粗糙度变化函数模型,并对工艺参数进行优化,为激光清洗调控铝合金表面形貌提供理论基础和工艺指导。
2 实验方法
2.1 实验设备与材料
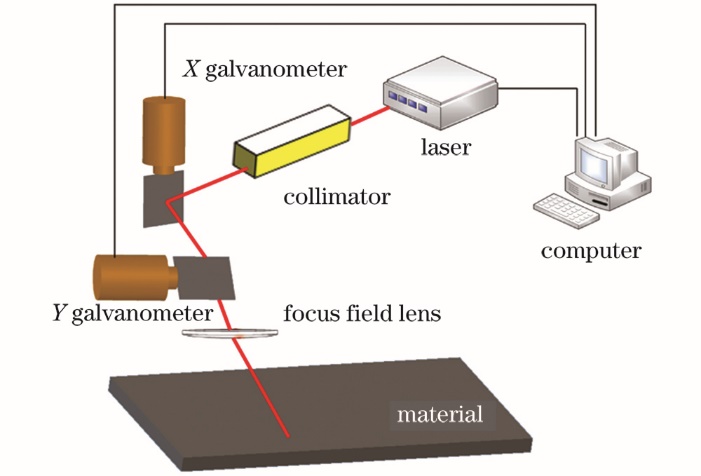
使用最大功率为100 W的脉冲激光器(YDFLP-100-LM1)进行激光清洗实验,X振镜和Y振镜的高速运动将激光能量以二维排布的形式作用于材料表面,激光清洗设备结构如
使用的厚度为2 mm的6061铝合金具有密度低、比强度高等优点,在新能源汽车车身中得到了广泛应用,化学成分如
表 1. 6061铝合金各组分的质量分数
Table 1. Mass fraction of each component for 6061 aluminum alloy
|
2.2 实验步骤
采用单因素实验研究平均功率P、扫描速度v和线间距ly对激光清洗效果的影响。平均功率影响激光能量的大小,过小的功率无法去除表面氧化层,而过大的功率会导致二次氧化。扫描速度和线间距分别影响横向光斑间距lx和纵向光斑间距,如
扫描速度与横向光斑间距的关系为
式中:f为重复频率。
激光清洗前,采用线切割方法将铝合金板材切成10 mm×10 mm×2 mm的方形试样,并用酒精擦拭表面。激光清洗后,采用扫描电子显微镜(FEI Sirion 200型)对表面形貌进行表征,采用能谱仪(EDS)对表面元素含量变化进行测试,采用超景深三维显微镜(OLYMPUS DSX 510型)测试表面粗糙度Sa的变化。
2.3 工艺参数优化方法
激光清洗会明显改变铝合金的表面形貌和粗糙度。相关研究人员发现高粗糙度会增大表面对激光的吸收率以及涂层与基材间的附着力[18-20]。考虑到激光清洗是激光焊接和涂装的预处理手段,在建立的激光清洗工艺窗口内,基于响应面分析方法,以能达到的最大粗糙度为目标对工艺参数进行进一步优化。响应面分析法是用于处理多变量问题建模和优化的统计方法,并逐渐成为工程设计优化最有效的工具之一[21-22]。
对于一个响应量y,可构造一个多项式近似函数表达其与一系列变量x的关系:
以二阶响应面模型为例,响应面近似函数为
式中:n为变量x的个数;α0、αi和αij分别为常数项系数、一次项系数和二次项系数。
3 实验结果和讨论
3.1 6061铝合金激光清洗后表面形貌变化分析
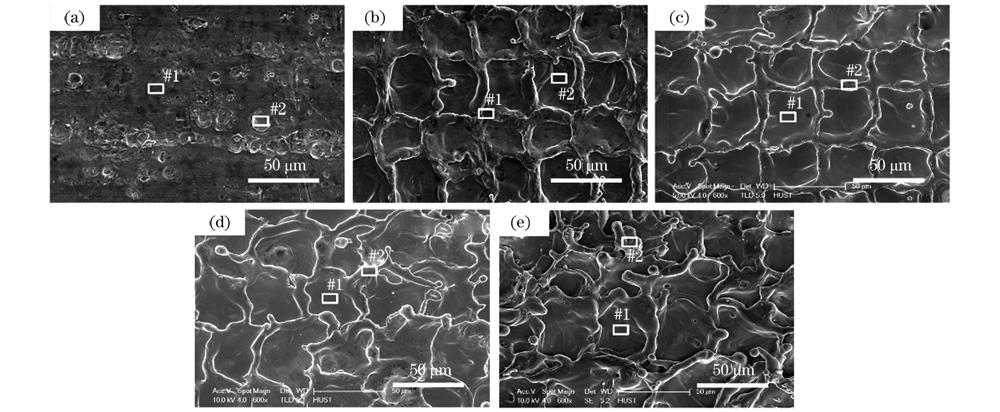
图 3. 不同功率激光清洗后6061铝合金的表面形貌。(a) 15 W;(b) 30 W;(c) 45 W;(d) 60 W;(e) 75 W
Fig. 3. Surface morphology of 6061 aluminum alloy after laser cleaning with different power. (a) 15 W; (b) 30 W; (c) 45 W; (d) 60 W; (e) 75 W
表面形貌的变化会显著影响粗糙度。线粗糙度基于线轮廓法评定粗糙度,用于表征表面一维轮廓的粗糙程度;面粗糙度基于区域形貌评定粗糙度,用于表征物体表面二维形貌的粗糙程度。面粗糙度更适合表征激光清洗后材料表面粗糙度的变化情况。
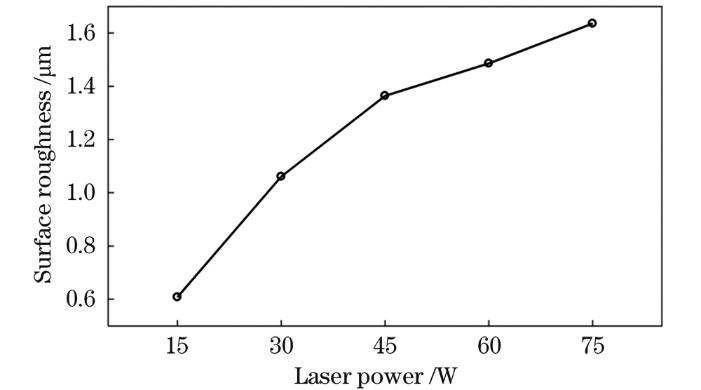
图 5. 不同功率激光清洗后铝合金表面粗糙度
Fig. 5. Surface roughness of 6061 aluminum alloy after laser cleaning with different power
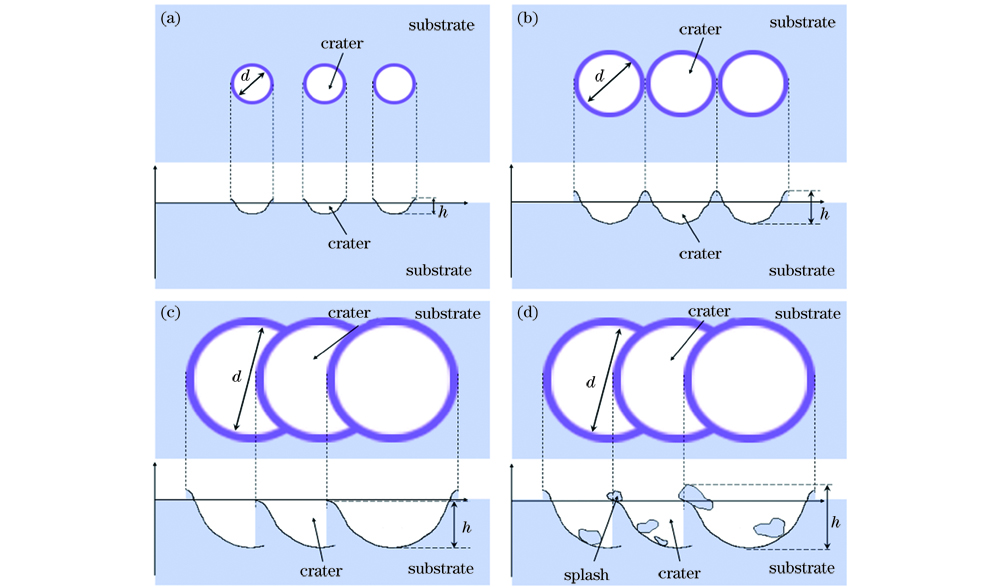
图 6. 铝合金表面形貌随激光功率的变化过程。(a)~(d)阶段1~阶段4
Fig. 6. Change process of aluminum alloy surface morphology varying with laser power. (a)--(d) Stage 1--stage 4
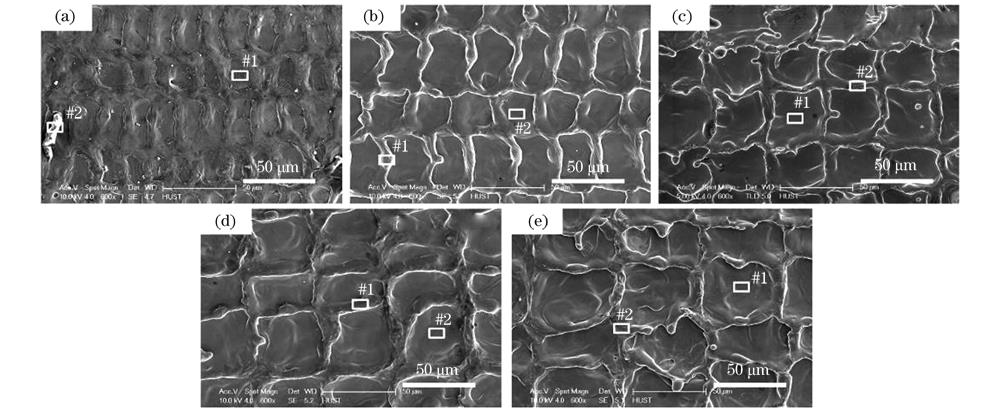
图 7. 不同扫描速度激光清洗后铝合金的表面形貌。(a) 2000 mm/s;(b) 3000 mm/s;(c) 4000 mm/s;(d) 5000 mm/s;(e) 6000 mm/s
Fig. 7. Surface morphology of 6061 aluminum alloy after laser cleaning with different scanning speed. (a) 2000 mm/s; (b) 3000 mm/s; (c) 4000 mm/s; (d) 5000 mm/s; (e) 6000 mm/s
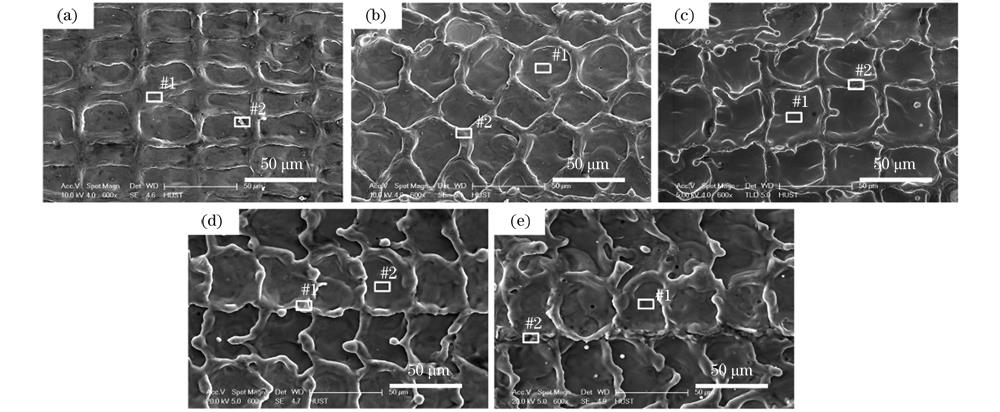
图 8. 不同线间距激光清洗后6061铝合金的表面形貌。(a) 0.02 mm;(b) 0.03 mm;(c) 0.04 mm;(d) 0.05 mm;(e) 0.06 mm
Fig. 8. Surface morphology of 6061 aluminum alloy after laser cleaning with different line spacing. (a) 0.02 mm; (b) 0.03 mm; (c) 0.04 mm; (d) 0.05 mm; (e) 0.06 mm

图 9. 不同扫描速度和线间距激光清洗后铝合金表面粗糙度。(a)扫描速度;(b)线间距
Fig. 9. Surface roughness of 6061 aluminum alloy after laser cleaning with different scanning speed and line spacing. (a) Scanning speed; (b) line spacing

图 10. 表面形貌随光斑间距的变化过程。(a)~(c)阶段1~阶段3
Fig. 10. Change process of surface morphology varying with spot spacing. (a)--(c) Stage 1--stage 3
3.2 6061铝合金激光清洗工艺窗口的建立
铝合金表面氧化层的主要成分为Al2O3·3H2O,表面氧元素的含量可作为激光清洗效果的评价指标。采用EDS测试了不同工艺参数激光清洗后铝合金表面元素含量,每种工艺参数下检测2个不同的样本点以减小实验误差,检测位置如
表 2. 不同功率激光清洗后铝合金表面微区元素质量分数
Table 2. Mass fraction of elements in micro-area on surface of aluminum alloy after laser cleaning with different power unit:%
| |||||||||||||||||||||||||||||||||||||||||||||||||||||||||||||||||
表 3. 不同扫描速度激光清洗后铝合金表面微区元素质量分数
Table 3. Mass fraction of elements in micro-area on surface of aluminum alloy after laser cleaning with different scanning speed unit:%
| |||||||||||||||||||||||||||||||||||||||||||||||||||||||||||||||||
表 4. 不同线间距激光清洗后铝合金表面微区元素质量分数
Table 4. Mass fraction of elements in micro-area on surface of aluminum alloy after laser cleaning with different line spacing unit:%
| |||||||||||||||||||||||||||||||||||||||||||||||||||||||||||||||||
从
4 工艺参数优化
4.1 面向粗糙度的6061铝合金激光清洗响应面模型的构建
粗糙度的变化显著影响铝合金的后续加工(如焊接、涂装等)。建立工艺窗口,采用Box-Behnken实验设计方法构建粗糙度变化的响应面函数(即激光清洗后6061铝合金的表面粗糙度与脉冲激光的平均功率、扫描速度、线间距之间的函数关系式),实验结果如
表 5. 6061铝合金激光清洗实验设计及粗糙度测试结果
Table 5. Experimental design and roughness test results of 6061 aluminum alloy using laser cleaning
| ||||||||||||||||||||||||||||||||||||||||||||||||||||||||||||||||||||||||||||||||||||||||||||||||||||||||||||||||||||||||||||||||||||||||||||||||||||||||||||||||||||||||
对实验数据进行拟合,采用如(3)式所示的二次多项式模型作为实际函数的近似,最终得出的6061铝合金经激光清洗后表面粗糙度Sa的二阶响应面模型方程为
根据概率统计知识,该二阶响应面模型的方差分析结果如
表 6. 激光清洗铝合金表面粗糙度的二阶响应面模型的方差分析
Table 6. Variance analysis of the second-order response surface model of aluminum alloy surface roughness after laser cleaning
|
选定显著性水平α=0.05。从
表 7. 6061铝合金激光清洗最优工艺
Table 7. Optimal laser cleaning process for 6061 aluminum alloy
|
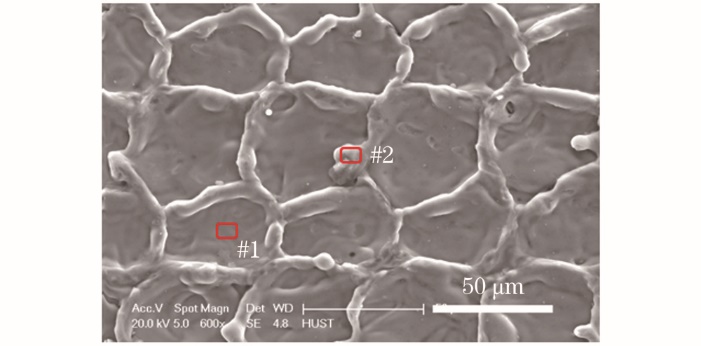
图 11. 功率60 W,扫描速度4950 mm/s,线间距0.04 mm时6061铝合金的表面形貌
Fig. 11. Surface morphology of 6061 aluminum alloy when power is 60 W, scanning speed is 4950 mm/s, and line spacing is 0.04 mm
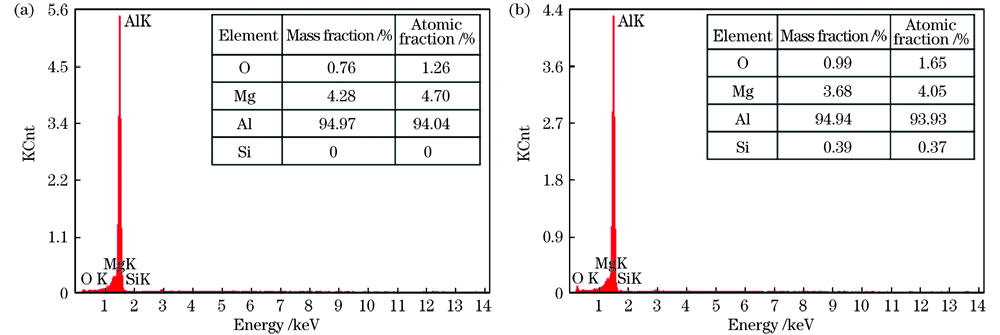
图 12. 功率为60 W,扫描速度为4950 mm/s,线间距为0.04 mm时,6061铝合金的表面元素相对含量。(a)位置#1处;(b)位置#2处
Fig. 12. Relative content of surface elements of 6061 aluminum alloy when power is 60 W, scanning speed is 4950 mm/s, and line spacing is 0.04 mm. (a) Location #1; (b) location #2
5 结论
研究了激光清洗对6061铝合金表面形貌的影响规律,建立了激光清洗6061铝合金表面自然氧化层的工艺窗口。基于此窗口,构建了6061铝合金表面粗糙度变化的函数模型,并对工艺参数进行进一步优化。得出的主要结论如下。
1) 平均功率影响凹坑形貌的尺寸变化,进而改变表面粗糙度。在扫描速度为4000 mm/s,线间距为0.04 mm时,当功率由15 W升高到75 W,粗糙度Sa由0.608 μm增大至1.636 μm。
2) 扫描速度和线间距影响相邻凹坑的搭接形貌,进而改变粗糙度。随着扫描速度和线间距的升高,粗糙度呈现先增大后减小的趋势。功率为45 W时,在扫描速度为4000 mm/s,线间距为0.04 mm处,粗糙度Sa最大为1.364 μm。
3) 根据元素能谱测试结果发现,激光清洗6061铝合金表面自然氧化层的工艺参数窗口为平均功率为30~60 W,扫描速度为3000~5000 mm/s,线间距0.03~0.05 mm。
4) 在此工艺窗口内,建立了6061铝合金表面粗糙度变化的响应面函数模型,表面粗糙度达到最大时的工艺参数为平均功率为60 W,扫描速度为4950 mm/s,线间距为0.041 mm,粗糙度Sa为1.584 μm。元素能谱测试结果显示,以此工艺参数进行激光清洗后,表面氧元素的质量分数低于1%,满足工业应用需求。
[1] 郑晖, 赵曦雅. 汽车轻量化及铝合金在现代汽车生产中的应用[J]. 锻压技术, 2016, 41(2): 1-6.
Zheng H, Zhao X Y. Lightweight automobile and application of aluminum alloys in modern automobile production[J]. Forging & Stamping Technology, 2016, 41(2): 1-6.
[2] 俞宗华. 7075高强铝合金搅拌摩擦焊工艺及接头组织和力学性能研究[D]. 广州: 华南理工大学, 2020.
Yu ZH. Research on microstructure and mechanical properties of friction stir welded joints for 7075 high strength aluminum alloy[D]. Guangzhou: South China University of Technology, 2020.
[3] 陈一鸣. 铝合金焊前激光清洗工艺及评估[D]. 武汉: 华中科技大学, 2018.
Chen YM. Research on pre-welding laser cleaning of aluminum alloy and evaluation[D]. Wuhan: Huazhong University of Science and Technology, 2018.
[4] Wang Q, Guan Y C, Cong B Q, et al. Laser cleaning of commercial Al alloy surface for tungsten inert gas welding[J]. Journal of Laser Applications, 2016, 28(2): 022507.
[5] AlShaer A W, Li L, Mistry A. The effects of short pulse laser surface cleaning on porosity formation and reduction in laser welding of aluminium alloy for automotive component manufacture[J]. Optics & Laser Technology, 2014, 64: 162-171.
[7] Zheng B X, Jiang G D, Wang W J, et al. Surface ablation and threshold determination of AlCu4SiMg aluminum alloy in picosecond pulsed laser micromachining[J]. Optics & Laser Technology, 2017, 94: 267-278.
[8] Zhu G D, Wang S R, Cheng W, et al. Investigation on the surface properties of 5A12 aluminum alloy after Nd∶YAG laser cleaning[J]. Coatings, 2019, 9(9): 578.
[9] Shi T Y, Wang C M, Mi G Y, et al. A study of microstructure and mechanical properties of aluminum alloy using laser cleaning[J]. Journal of Manufacturing Processes, 2019, 42: 60-66.
[10] Zhang G X, Hua X M, Li F, et al. Effect of laser cleaning process parameters on the surface roughness of 5754-grade aluminum alloy[J]. The International Journal of Advanced Manufacturing Technology, 2019, 105(5/6): 2481-2490.
[11] Zhang G X, Hua X M, Huang Y, et al. Investigation on mechanism of oxide removal and plasma behavior during laser cleaning on aluminum alloy[J]. Applied Surface Science, 2020, 506: 144666.
[12] Liu B W, Mi G Y, Wang C M. Study on surface state and thermophysical properties of TA15 alloy by laser ablation[J]. Journal of Manufacturing Processes, 2021, 62: 483-490.
[13] Liu B W, Mi G Y, Wang C M. Research on grain refinement and wear behavior of micro-remelted TA15 alloy surface by laser cleaning[J]. Materials Chemistry and Physics, 2021, 259: 124022.
[14] Liu B W, Mi G Y, Wang C M. Study on the morphology and microstructure of 5A06 alloy by high-pulse-frequency pulsed laser micro polishing[J]. Materials Chemistry and Physics, 2020, 255: 123500.
[15] 王刚. 脉冲激光清洗对铝合金表面形貌及焊接质量的影响研究[D]. 长沙: 湖南大学, 2018.
WangG. Study on effect of pulse laser cleaning on surface morphology and welding quality of aluminum alloy[D]. Changsha: Hunan University, 2018.
[16] 董文祺. 激光清洗5083铝合金阳极氧化膜对激光焊接质量的影响[D]. 武汉: 湖北工业大学, 2018.
Dong WQ. Influence of removal of anodic oxide film from 5083 aluminum alloy by laser cleaning on the welding quality of laser welding[D]. Wuhan: Hubei University of Technology, 2018.
[17] 黄建宇. 6061铝合金焊接前纳秒激光表面预处理机制与实验研究[D]. 镇江: 江苏大学, 2018.
Huang JY. Research on pretreatment mechanism and experiment of 6061 aluminum alloy by nanosecond laser before welding[D]. Zhenjiang: Jiangsu University, 2018.
[18] Ang L K, Lau Y Y, Gilgenbach R M, et al. Analysis of laser absorption on a rough metal surface[J]. Applied Physics Letters, 1997, 70(6): 696-698.
[19] Wang X, Xu M Y, Wang Z W, et al. Properties of jet-plated Ni coating on Ti alloy (Ti6Al4V) with laser cleaning pretreatment[J]. Metals, 2019, 9(2): 248.
[20] Maroofi A, Navab S N, Ghomi H. Atmospheric air plasma jet for improvement of paint adhesion to aluminum surface in industrial applications[J]. International Journal of Adhesion and Adhesives, 2020, 98: 102554.
[21] 罗爱辉. 电阻点焊电极热流耦合分析与对流换热特性研究[D]. 上海: 上海交通大学, 2007.
Luo AH. Study on heat flow coupling and heat convecting of resistance spot welding electrode[D]. Shanghai: Shanghai Jiao Tong University, 2007.
[22] 张小云. 双相钢点焊熔核界面撕裂失效机理与控制方法研究[D]. 上海: 上海交通大学, 2008.
Zhang XY. Research on failure mechanism and control methods of interfacial fracture mode for dual phase steel welds[D]. Shanghai: Shanghai Jiao Tong University, 2008.
[23] Guo L Y, Geng S N, Gao X S, et al. Numerical simulation of heat transfer and fluid flow during nanosecond pulsed laser processing of Fe78Si9B13 amorphous alloys[J]. International Journal of Heat and Mass Transfer, 2021, 170: 121003.
Article Outline
李宇强, 郭玲玉, 蒋平, 耿韶宁, 王春明, 高嵩, 韩楚. 铝合金激光清洗表面形貌变化的实验研究及工艺参数优化[J]. 中国激光, 2021, 48(22): 2202016. Yuqiang Li, Lingyu Guo, Ping Jiang, Shaoning Geng, Chunming Wang, Song Gao, Chu Han. Experimental Study on Surface Morphology Changes of Aluminum Alloy Using Laser Cleaning and Optimization of Process Parameters[J]. Chinese Journal of Lasers, 2021, 48(22): 2202016.
